
When your car AC is not blowing cold air, the problem usually comes from low refrigerant, a leak, poor airflow, a weak compressor, a bad relay, a faulty pressure switch, or a control issue inside the cabin. A car air conditioning system works by moving refrigerant through several parts, including the compressor, condenser, expansion valve or orifice tube, evaporator, hoses, switches, relays, and cabin controls.
The compressor pressurizes refrigerant and sends it toward the condenser. The condenser releases heat outside the cabin, then the refrigerant moves through a metering device before reaching the evaporator. Inside the evaporator, refrigerant absorbs heat from the cabin air so the vents can blow cold air. The cycle continues as refrigerant returns to the compressor and repeats.
Understanding this basic cycle helps you troubleshoot the problem safely. Some checks, such as inspecting fuses, cabin filters, visible leaks, and belt condition, are beginner-friendly. Other repairs, including refrigerant recovery, leak repair, compressor replacement, and AC system charging, should be handled by a certified mechanic or mobile AC technician.
Quick Answer
If your car AC is not blowing cold air, start by checking the cabin air filter, condenser airflow, compressor clutch operation, AC fuse, relay, belt, and visible leak signs. Low refrigerant is common, but refrigerant should not be added until leaks and pressure readings are checked correctly.
Key Takeaways
- Low refrigerant can reduce cooling, but it usually means the system has a leak that needs repair.
- A dirty condenser, clogged cabin filter, or weak cooling fan can stop the AC from removing heat properly.
- The compressor, relay, pressure switch, belt, and electrical controls all affect whether cold air reaches the vents.
- Avoid venting refrigerant or guessing with DIY recharge cans because wrong pressure can damage the system.
- Get professional help if the compressor does not engage, pressure readings look abnormal, or the system loses refrigerant again.
At a Glance
| Time Required | 15 to 45 minutes for basic checks; longer for leak testing or repairs |
| Difficulty | Beginner for visual checks; advanced for refrigerant and electrical diagnosis |
| Tools Needed | Flashlight, gloves, owner’s manual, multimeter, manifold gauges, leak detector, and basic hand tools |
| Cost | Basic inspection may cost little; leak repair, recharge, or compressor work can cost much more |
Warning: Automotive refrigerant is pressurized and must be handled safely. Do not vent refrigerant into the air, bypass safety switches, or overcharge the system. If you do not have the proper tools and training, let a certified technician service the AC system.
Understanding the Car AC System
Your car AC system does more than blow cool air through the vents. It removes heat and moisture from the cabin, then releases that heat outside the vehicle. When one part of the cycle fails, the system may blow warm air, cool only while driving, cycle on and off quickly, or stop working completely.
The main parts include the compressor, condenser, receiver-drier or accumulator, expansion valve or orifice tube, evaporator, blower motor, cabin air filter, pressure switches, relays, fuses, sensors, and climate controls. The compressor moves refrigerant through the system. The condenser cools hot refrigerant near the front of the vehicle. The evaporator absorbs heat inside the dash, while the blower motor pushes air across it and into the cabin.
Before you replace expensive parts, start with simple clues. Does the air blow strongly but stay warm? Does the compressor clutch engage? Does cooling improve at highway speed? Is one side of the cabin cold while the other side is warm? These details help narrow the cause.
Check the Basic Symptoms First
Begin with the easiest checks before moving to refrigerant or electrical testing. Turn the engine on, set the AC to the coldest setting, choose recirculation mode, and set the fan to high. Let the system run for a few minutes with the windows open, then check the vent temperature and airflow strength.
If airflow is weak, the issue may be a dirty cabin filter, failing blower motor, blocked vents, or evaporator icing. If airflow is strong but warm, the problem may involve low refrigerant, a compressor fault, condenser airflow, blend door movement, or an electrical control issue.
Also compare cooling at idle and while driving. If the AC cools better on the road than at a stop, inspect the condenser fan, condenser fins, and front-end airflow. If the AC starts cold and then becomes warm, the system may have pressure problems, icing, a failing clutch, or an intermittent electrical fault.
Note: A car AC can blow warm air for more than one reason at the same time. For example, low refrigerant can cause poor cooling, while a dirty condenser can make the problem worse in hot traffic.
Checking the Refrigerant Levels
Refrigerant levels are critical for efficient AC operation. Too little refrigerant can lead to poor cooling, evaporator icing, or compressor shutoff. Too much refrigerant can create unsafe pressure and may damage the compressor, hoses, seals, or condenser.
To check refrigerant properly, a technician connects a manifold gauge set to the high-side and low-side service ports. The readings must be compared with ambient temperature, vehicle specifications, compressor operation, and cooling fan behavior. A single low-side gauge from a recharge can does not give the full picture.
If pressure readings are low, the system may have a leak or may have been undercharged after a previous repair. If pressure readings are too high, the system may be overcharged, restricted, contaminated with air, or struggling with poor condenser airflow. Guessing can make the problem worse.
Low refrigerant should be treated as a symptom, not the final diagnosis. A sealed AC system should not need frequent top-offs. If your AC cools for a short time after recharging and then blows warm again, a leak is likely.
Pro Tip: Check the under-hood label before any AC service. It usually lists the refrigerant type and charge amount for that specific vehicle.
[Amazon Products Picked for You]

COMPLETE GAUGE SET: This professional automotive AC tool kit from Orion Motor Tech includes a 3-way gauge, 3 color-coded hoses, 2 adjustable 1/4'' quick couplers, a 1/4'' to 1/2'' 29° trap adapter, and both puncture-style and self-sealing can taps

Complete AC Gauge Set: Orion Motor Tech's 3-way manifold gauge set includes 5 ft. hoses, R134a couplers, 29° adapter, piercing & self-sealing can taps, and more for servicing R12, R134a, R502, and R22 systems
Inspecting the Compressor

The compressor is often called the heart of the car AC system because it circulates refrigerant. It compresses low-pressure refrigerant vapor into high-pressure vapor, which allows heat to move through the condenser and out of the cabin.
When inspecting the compressor, listen for grinding, rattling, clicking, squealing, or rapid cycling. A healthy compressor should engage smoothly and operate without harsh noise. If the compressor clutch never engages, the cause may be low refrigerant pressure, a bad relay, a blown fuse, a faulty pressure switch, damaged wiring, or a failed compressor clutch.
Also inspect the compressor body and hose connections for oily residue. Refrigerant oil often escapes with refrigerant, so wet or greasy buildup near fittings can point to a leak. Check the electrical connector for corrosion, loose pins, or broken wiring.
If the compressor engages but cooling is still poor, pressure testing is needed. The compressor may be weak internally, the system may be restricted, or the condenser may not be removing heat. Because compressor replacement often requires flushing, replacing related parts, evacuating air and moisture, and charging by weight, this repair is usually best left to a professional.
[Amazon Products Picked for You]

[Specifications]: ①Compressor Style: DKV10R/DKV10Z; ②Pulley Groove Quantity: 6; ③Pulley Diameter (MM): 109.73; ④Voltage: 12V

Brand New, OE replacement: UAC branded FS20 Compressor Assembly

Key Specifications:✅Clutch Included: Yes; ✅Oil Prefilled: Yes;✅ Oil Type: PAG46/PAG 100; ✅ Condition: 100% Brand New OEM-equivalent quality
Examining the Condenser
| Condenser Parameter | Value |
|---|---|
| Condenser Temperature | 45°C |
| Condenser Pressure | 150 psi |
| Condenser Efficiency | 85% |
The condenser sits near the front of the vehicle, usually in front of or beside the radiator. Its job is to release heat from the refrigerant. If the condenser cannot remove heat, the AC may blow warm air, especially at idle or in stop-and-go traffic.
Look through the grille and inspect the condenser fins. Dirt, leaves, bugs, road debris, bent fins, or damage from stones can reduce airflow. Clean the condenser gently with low-pressure water and avoid crushing the fins. If fins are bent, a fin comb can help straighten them carefully.
Next, check the cooling fan. Many vehicles rely on an electric fan to pull air through the condenser when the car is stopped. If the fan does not run when the AC is on, high-side pressure can climb and cooling can drop quickly. A bad fan motor, fan relay, fuse, resistor, module, wiring fault, or sensor can all cause this problem.
Keep the area around the condenser clear. After front-end repairs, make sure no panels, seals, or aftermarket accessories block airflow. Poor airflow can create symptoms that look like refrigerant problems even when the charge is correct.
Assessing the Evaporator
The evaporator coil is where cabin cooling happens. It sits inside the HVAC case under the dashboard. As refrigerant passes through the evaporator, it absorbs heat from air that the blower motor pushes across the coil.
When the evaporator works correctly, air from the vents becomes cooler and drier. If the evaporator is dirty, blocked, frozen, or leaking, cooling performance drops. You may notice weak airflow, musty smells, water dripping inside the cabin, or cold air that fades after a few minutes.
Frost or ice buildup can indicate low refrigerant, a dirty cabin filter, blocked airflow, a faulty evaporator temperature sensor, or an expansion valve problem. Ice restricts airflow and can make the vents feel weak even when the fan is set to high.
Cleaning the evaporator can be difficult because it is inside the dash. Start with the cabin air filter because it is easier to access and often overlooked. A clogged filter limits airflow across the evaporator and can make the AC feel weak. If the evaporator itself needs cleaning or leak repair, professional service may be needed.
Checking for Leaks

Leak detection is one of the most important steps when a car AC is not blowing cold air. Refrigerant does not get used up like fuel. If the system is low, refrigerant has likely escaped through a hose, seal, condenser, evaporator, compressor shaft seal, service port, or fitting.
Technicians often use electronic leak detectors, nitrogen pressure testing, or ultraviolet dye to find leaks. UV dye mixes with refrigerant oil and becomes visible under UV light where refrigerant escapes. Visual checks can also reveal oily residue around hose crimps, compressor fittings, condenser corners, and service ports.
Small leaks may cool normally for a while and then slowly lose performance. Larger leaks can keep the compressor from engaging at all because the pressure switch protects the system from running too low. Repairing the leak before recharging helps prevent repeated failures.
If a leak is detected, the correct repair depends on the location. A damaged O-ring may be simple to replace, while a leaking evaporator may require dashboard disassembly. After repair, the system should be evacuated to remove air and moisture, then charged with the correct refrigerant amount by weight.
Inspecting the AC Belt
The AC belt drives the compressor on many vehicles. Some cars use a single serpentine belt for multiple accessories, while others use a separate belt for the AC compressor. If the belt slips, breaks, or loses tension, the compressor may not turn correctly.
Inspect the belt for cracks, fraying, missing ribs, glazing, oil contamination, or uneven wear. A shiny belt surface can mean slipping. A squealing noise when the AC turns on can point to belt slip, a weak tensioner, misalignment, or a compressor that is hard to turn.
Proper tension matters. A loose belt may slip under load, while an overtightened belt can stress bearings and pulleys. Many modern vehicles use automatic tensioners, but those tensioners can wear out over time. If the belt moves excessively, flutters, or jumps, inspect the tensioner and pulleys too.
Never place your hands near moving belts or pulleys while the engine is running. Inspect the belt with the engine off and the key removed. If the belt path is hard to access or the compressor pulley looks damaged, have a mechanic inspect it.
Testing the AC Pressure Switch
The AC pressure switch protects the system by monitoring refrigerant pressure. If pressure is too low or too high, the switch can prevent the compressor from running. This helps protect the compressor from damage and helps prevent unsafe pressure conditions.
Testing the pressure switch usually involves reading system pressure and checking the electrical circuit. A multimeter can confirm whether the switch has continuity when pressure is within the expected range. However, the result only makes sense when pressure readings are known.
If the pressure switch appears open, do not automatically replace it. The switch may be doing its job because refrigerant pressure is too low or too high. Low pressure can mean a leak. High pressure can mean overcharge, condenser airflow problems, a restriction, or a fan issue.
Some newer vehicles use pressure sensors instead of simple switches. These sensors send variable signals to the vehicle computer. Diagnosis may require a scan tool that reads AC pressure data, command status, and climate control module codes.
Checking the AC Relay
The AC relay works as an electrical switch that sends power to AC components, often including the compressor clutch or cooling fan circuit. If the relay fails, the compressor may not engage even when the rest of the AC system is working.
Start by checking the owner’s manual or fuse box cover to locate the AC relay and related fuses. Inspect the fuse first. A blown fuse can stop compressor operation, but replacing it without finding the cause may lead to another blown fuse.
A relay can be tested with a multimeter or swapped with an identical relay from a non-critical circuit if the vehicle design allows it. Look for burnt terminals, corrosion, loose fitment, melted plastic, or heat damage in the fuse box.
If the relay clicks but the compressor still does not engage, the fault may be in the wiring, compressor clutch coil, pressure switch, climate control module, or ground connection. Electrical testing should follow the wiring diagram for your specific vehicle.
Examining the AC Controls
The AC controls include the dashboard buttons, knobs, touchscreen settings, thermostat sensors, control head, blend door actuators, mode doors, and sometimes a dedicated climate control module. These parts decide when the AC runs and where air flows.
A control problem can make the AC seem weak even when the refrigeration system is healthy. For example, a stuck blend door can mix hot heater air with cold evaporator air, causing warm vents. A failed mode door can send cold air to the wrong vents. A bad recirculation door can keep pulling hot outside air into the cabin.
Check whether the AC light turns on, the fan speeds work, the temperature setting changes, and air moves between floor, dash, and defrost vents. Listen for clicking behind the dash, which can point to a stripped actuator gear.
Dual-zone climate systems can add another clue. If the driver side is cold but the passenger side is warm, or the opposite happens, a blend door actuator or temperature sensor may be the cause rather than low refrigerant.
Check the Cabin Air Filter and Blower Airflow
A clogged cabin air filter is one of the easiest problems to miss. It can make the AC feel weak because not enough air passes through the evaporator and vents. Even if the air is cold, the cabin may not cool well when airflow is restricted.
Most cabin filters sit behind the glove box, under the dashboard, or near the cowl area. Remove the filter and inspect it for dust, leaves, pollen, pet hair, or moisture. If it is dirty, replace it with the correct filter for your vehicle.
Also test all blower speeds. If only one speed works, the blower resistor or control module may be faulty. If the blower does not run at all, check the blower fuse, relay, motor, wiring, and ground.
Check the Expansion Valve or Orifice Tube
The expansion valve or orifice tube controls refrigerant flow into the evaporator. If this part sticks, clogs, or restricts flow, the AC may blow warm air even when refrigerant is present.
Common signs include abnormal pressure readings, frost in the wrong location, cycling problems, or cooling that changes suddenly. Debris in the system can clog an orifice tube, especially after compressor wear or internal failure.
This diagnosis requires pressure readings and system knowledge. If a restriction is suspected, a technician may need to recover the refrigerant, inspect the metering device, replace the receiver-drier or accumulator, and flush contaminated lines when appropriate.
When the AC Blows Cold Only While Driving
If the AC cools well at highway speed but turns warm at idle, focus on condenser airflow first. Driving pushes air through the condenser, but at a stop the cooling fan must do that job.
Check whether the condenser fan runs when the AC is on. Also inspect the condenser fins, radiator area, fan shroud, and front grille openings. Heat from the engine bay can overwhelm the AC when airflow is poor.
A weak compressor or incorrect refrigerant charge can also cause idle cooling problems, but airflow is one of the most common places to start.
When the AC Blows Cold Then Warm
An AC system that starts cold and then turns warm can point to icing, pressure switch cycling, a failing compressor clutch, a weak relay, an overheating control module, or a sensor fault.
If airflow gets weaker as cooling fades, the evaporator may be freezing. Turn the AC off but keep the fan running. If airflow returns after several minutes, icing is likely. Causes can include low refrigerant, poor airflow, a dirty filter, or an evaporator temperature sensor issue.
If airflow stays strong but the air becomes warm, watch whether the compressor clutch disengages. A clutch gap issue, electrical fault, pressure problem, or overheating coil may be involved.
When to Avoid DIY AC Recharge Cans
DIY recharge cans can seem like a quick fix, but they can create new problems when used without proper diagnosis. Many kits show only low-side pressure, which does not confirm the full system condition.
Adding refrigerant to a leaking system wastes refrigerant and delays the real repair. Adding too much refrigerant can raise pressure, reduce cooling, and damage components. Some cans also include sealers that may contaminate recovery equipment or clog small passages.
If you use any consumer AC product, read the label carefully and confirm that it matches your vehicle’s refrigerant type. Stop immediately if the compressor does not engage, pressure readings seem abnormal, or the system does not improve as expected.
[Amazon Products Picked for You]

★【Dimension】R134A AC Refrigerant Charge Hose Kit comes with Piercing Can Tap Valve 1/2" ACME, Low Side Quick Coupler 13mm, 15inch recharge hose (slight dimensional tolerances, no impact on use), 2.76inch length gauge. T type knobs have internal pin with sharp tip help to pierce refrigerant bottle easily and quickly. ONLY work with piercing cans of Freon. For R12 R22 refrigerant charging, you need use an adapter converter to charging.

EXCELLENT MAINTENANCE TOOL: The VIVOHOME 3.5 CFM Vacuum Pump features die-cast aluminum housing and a composite anti-slip rubber base, making it lightweight and durable; Ideal for diagnosing and recharging AC systems on your own; Efficiently removes moisture from air conditioning systems before refilling with refrigerant
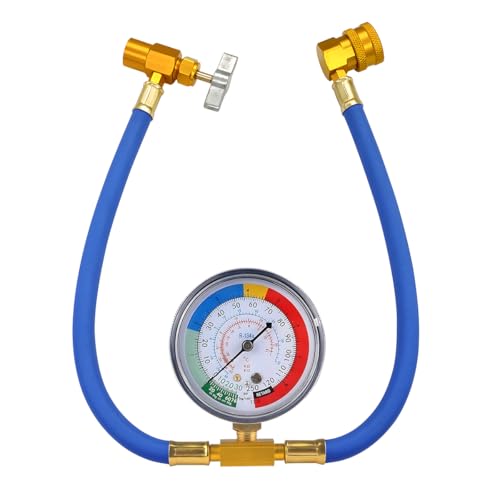
High Quality Material: This car AC refrigerant charge hose is crafted with high-strength aluminum material, which strong pressure resistance and corrosion resistance, not prone to deformation, extending the service life of the hose. Meanwhile, aluminum material has good thermal conductivity, which helps to quickly balance the temperature of the hose and the environment during filling, reducing pressure fluctuations caused by temperature differences and improving filling accuracy.
Seeking Professional Help
Many basic AC checks can be done at home, but certain tasks require specialized tools, training, and legal refrigerant handling. Professional help is the safest choice for leak repair, refrigerant recovery, system evacuation, exact charging, compressor replacement, major electrical diagnosis, and internal HVAC case repairs.
A technician can measure high-side and low-side pressure, inspect compressor command signals, check cooling fan operation, test sensors, locate leaks, recover refrigerant, remove moisture with a vacuum pump, and charge the system to the correct weight. These steps are hard to do accurately with basic tools.
Seek professional help if the compressor does not engage, the AC loses refrigerant repeatedly, you see oily residue near AC parts, the system makes harsh noises, the condenser fan does not work, or cooling changes from cold to warm while driving. Getting the diagnosis right can prevent unnecessary parts replacement.
If you’re struggling with your car’s AC not blowing cold air, you may also be interested in learning how to maximize space in your closet with the best way to fold clothes. Check out this helpful article here for tips on organizing your wardrobe efficiently.
Related Guides
Frequently Asked Questions
What are the common reasons for a car AC not blowing cold air?
Common reasons include low refrigerant, a refrigerant leak, a faulty compressor, a bad compressor clutch, a clogged expansion valve or orifice tube, poor condenser airflow, a dirty cabin air filter, a failed cooling fan, a bad relay, a faulty pressure switch, or a malfunctioning blend air door.
How can I troubleshoot my car AC not blowing cold air?
Start by checking airflow from the vents, the cabin air filter, the condenser for debris, the cooling fan, the AC fuse, the AC relay, the compressor clutch, and visible signs of oily refrigerant leaks. If those checks do not reveal the cause, pressure testing and leak detection are the next steps.
What should I do if my car AC is not blowing cold air?
First, check simple items such as the AC settings, cabin air filter, airflow, fuses, relay, condenser blockage, and compressor clutch operation. If the issue continues, take the vehicle to a certified mechanic or AC specialist for leak testing, pressure diagnosis, and proper repair.
Can low refrigerant make my car AC blow warm air?
Yes. Low refrigerant can reduce cooling and may stop the compressor from engaging if pressure drops too far. However, low refrigerant usually means there is a leak, so the leak should be found and repaired before the system is recharged.
Why does my car AC blow cold while driving but warm at idle?
This often points to poor condenser airflow. At highway speed, air naturally moves through the condenser. At idle, the cooling fan must move that air. A failed fan, dirty condenser, blocked fins, or high pressure problem can make the AC warmer when stopped.
Why does my car AC start cold and then turn warm?
Possible causes include evaporator icing, low refrigerant, a failing compressor clutch, a faulty pressure switch, a weak relay, a sensor problem, or poor airflow through the evaporator. If airflow gets weak as the air gets warm, icing or a clogged cabin filter may be involved.
How often should I service my car AC to prevent it from not blowing cold air?
Have your car AC inspected at least once a year or whenever cooling performance changes. Regular checks can catch refrigerant leaks, dirty filters, weak fans, belt wear, and early compressor issues before they become more expensive repairs.
Is it safe to recharge my car AC myself?
It can be risky if you do not know the system pressure, refrigerant type, and correct charge amount. Overcharging can damage parts, and recharging a leaking system does not fix the real problem. Professional diagnosis is safer when the cause is unclear.
