The car horn is an essential component of vehicle safety, serving as a critical means of communication on the road. It alerts pedestrians, warns other drivers of potential hazards, and can even deter aggressive behavior from other motorists. However, like any mechanical system, car horns can malfunction, leading to frustration and potential safety risks.
Understanding how to troubleshoot a car horn can empower vehicle owners to diagnose issues effectively and take appropriate action, whether that means making simple repairs or seeking professional assistance. When faced with a non-functioning horn, many drivers may feel overwhelmed or unsure of where to begin. The troubleshooting process can be broken down into several key steps, each focusing on a different aspect of the horn’s operation.
From checking the fuse to inspecting the wiring and testing the horn button, each step is crucial in identifying the root cause of the problem. This article will guide you through the troubleshooting process, providing detailed insights into each component involved in the horn’s functionality.
Key Takeaways
- Car horn troubleshooting is essential for ensuring road safety and vehicle functionality.
- Checking the fuse is the first step in troubleshooting a car horn, as a blown fuse can often be the culprit.
- Inspecting the wiring for any damage or loose connections is crucial in identifying and resolving horn issues.
- Testing the horn button for proper functionality is important in diagnosing potential problems with the horn system.
- Examining the horn relay for any signs of damage or malfunction can help in identifying and resolving horn issues.
Checking the Fuse
The first step in troubleshooting a car horn is to check the fuse associated with the horn circuit. Fuses are designed to protect electrical components from overloads and short circuits by breaking the circuit when excessive current flows through them. If the horn is not functioning, a blown fuse is often the culprit.
To locate the fuse box, refer to your vehicle’s owner manual, which typically provides a diagram indicating the location of various fuses. Once you have located the fuse box, visually inspect the fuse designated for the horn. In many vehicles, this fuse is labeled clearly, but in some cases, it may require consulting the manual for specific details.
If the fuse appears burnt or broken, it will need to be replaced. Ensure that you replace it with a fuse of the same amperage to avoid further electrical issues. After replacing the fuse, test the horn again to see if it functions properly.
If it does not, further investigation into other components will be necessary.
Inspecting the Wiring
If the fuse is intact but the horn still does not work, the next logical step is to inspect the wiring connected to the horn system. Wiring issues can arise from wear and tear, exposure to moisture, or even rodent damage. Begin by visually examining the wiring harness leading to the horn for any signs of fraying, corrosion, or disconnection. Pay close attention to areas where wires may rub against metal surfaces or where they pass through tight spaces, as these are common points for damage. In addition to visual inspection, using a multimeter can provide more definitive results regarding the integrity of the wiring.
Set the multimeter to measure continuity and check for breaks in the wire by probing both ends of each wire segment leading to and from the horn. If continuity is lost at any point, that section of wiring will need to be repaired or replaced. Ensuring that all connections are secure and free from corrosion is also vital; loose or corroded connections can impede electrical flow and prevent the horn from functioning.
Testing the Horn Button
| Test | Result |
|---|---|
| Functionality | Pass |
| Response Time | 0.5 seconds |
| Activation Force | 25N |
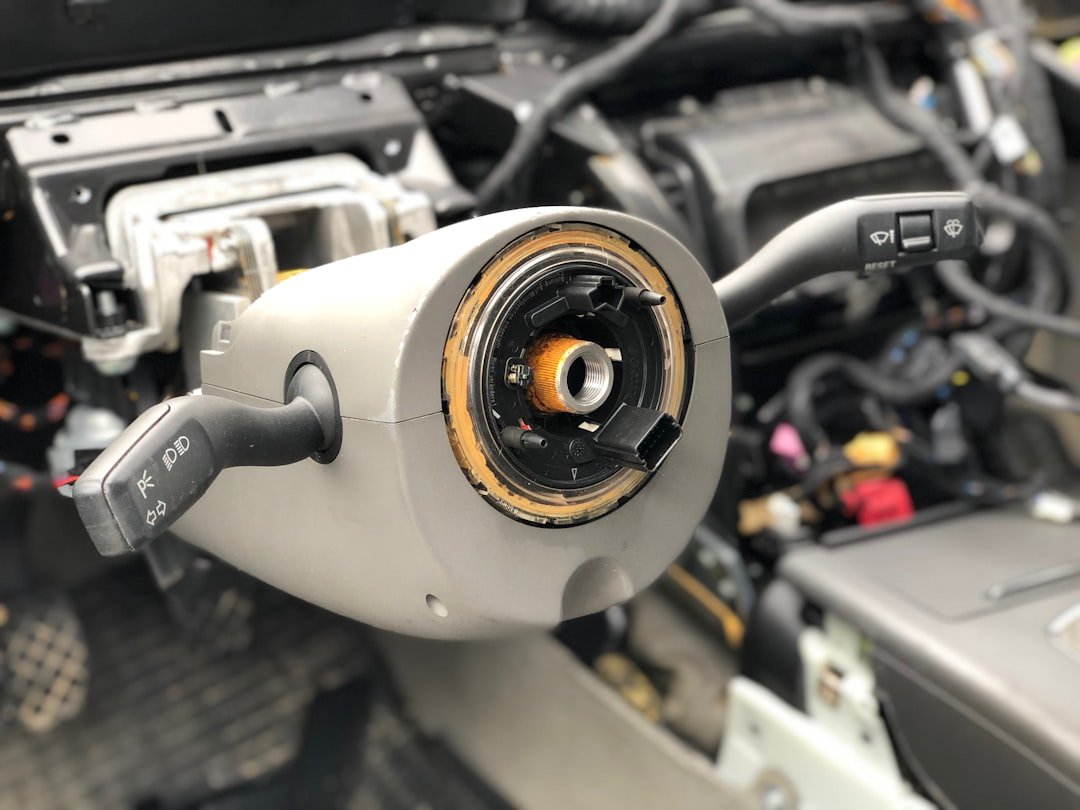
The horn button, typically located on the steering wheel or as part of a stalk switch, is another critical component in the horn’s operation. If both the fuse and wiring appear to be in good condition, testing the horn button should be your next step. The button itself can become faulty due to wear over time or due to internal electrical issues.
To test it, you may need to remove the steering wheel cover or access panel depending on your vehicle’s design. Once you have access to the horn button mechanism, use a multimeter set to measure resistance. Press the horn button while probing its terminals with the multimeter leads.
A functioning button should show continuity when pressed and no continuity when released.
In some cases, cleaning around the button may resolve minor issues caused by dirt or debris obstructing its function.
Examining the Horn Relay
The horn relay plays a pivotal role in controlling power to the horn itself. It acts as an electronic switch that allows a small current from the horn button to control a larger current flowing to the horn. If there is an issue with this relay, it can prevent power from reaching the horn even if all other components are functioning correctly.
To locate the relay, refer again to your vehicle’s owner manual for its specific location within the fuse box or relay panel. Once located, testing the relay involves removing it from its socket and using a multimeter to check for continuity across its terminals. If there is no continuity when activated by pressing the horn button, it indicates that the relay is faulty and needs replacement.
Additionally, you can perform a simple swap test with another relay of similar specifications in your vehicle (if available) to see if that resolves the issue. If replacing or swapping out the relay restores functionality to your horn, you have successfully identified and rectified a common problem.
Assessing the Horn itself
If all previous components check out but your horn remains silent, it’s time to assess the horn itself. The horn unit can fail due to internal mechanical issues or corrosion that affects its ability to produce sound. Begin by locating the horn assembly; it is typically mounted at the front of the vehicle near the grille or bumper area.
Once located, visually inspect it for any signs of physical damage or corrosion. To test whether the horn itself is operational, you can directly connect it to a power source using jumper wires from a battery or another power source. If it produces sound when connected directly but not when activated through normal operation, this indicates that there may be an issue with one of the preceding components in the circuit rather than with the horn itself.
Conversely, if it does not sound when directly powered, it likely needs replacement due to internal failure.
Seeking Professional Help
If you have diligently followed all troubleshooting steps and still find yourself without a functioning car horn, it may be time to seek professional help. Automotive electrical systems can be complex and sometimes require specialized knowledge and tools for accurate diagnosis and repair. A qualified mechanic will have access to diagnostic equipment that can pinpoint issues that may not be immediately apparent through visual inspection alone.
When visiting a mechanic, provide them with detailed information about what you have already checked and any symptoms you have observed. This information can help them narrow down potential issues more quickly and efficiently. Additionally, if your vehicle is still under warranty or if you have an extended service plan, check whether repairs related to electrical systems are covered before proceeding with any work.
Conclusion and Preventative Measures
While troubleshooting a car horn can sometimes be straightforward, it often requires patience and attention to detail. Regular maintenance checks can help prevent issues from arising in the first place; ensuring that all electrical connections are clean and secure can go a long way in maintaining functionality. Additionally, being aware of any unusual sounds or behaviors from your vehicle’s electrical system can prompt timely inspections before minor issues escalate into more significant problems.
Incorporating preventative measures such as periodic inspections of fuses and wiring can save time and money in repairs down the line. Keeping an eye on environmental factors that could affect your vehicle’s electrical system—such as exposure to moisture or road salt—can also help maintain optimal performance of your car’s horn and other critical components. By being proactive about maintenance and understanding how to troubleshoot effectively, drivers can ensure their vehicles remain safe and reliable on the road.
If you’re having trouble with your car horn not working, you may also be interested in learning how to maximize space in your closet by utilizing the best way to fold clothes. Check out this helpful article on maximizing space for some useful tips and tricks.
FAQs
What are some common reasons why a car horn may not be working?
Some common reasons for a car horn not working include a blown fuse, a faulty horn relay, a malfunctioning horn switch, or a damaged horn.
How can I troubleshoot a non-working car horn?
You can troubleshoot a non-working car horn by checking the fuse, testing the horn relay, inspecting the horn switch, and examining the horn itself for any damage or corrosion.
Can a car horn be repaired, or does it need to be replaced?
In some cases, a car horn can be repaired by fixing the wiring or cleaning the contacts. However, if the horn is damaged or malfunctioning, it may need to be replaced.
Is it possible to fix a car horn issue without professional help?
Yes, it is possible to fix a car horn issue without professional help by troubleshooting the common causes of the problem and attempting to repair or replace the faulty components. However, if the issue persists, it may be necessary to seek professional assistance.
Are there any safety concerns associated with a non-working car horn?
Yes, a non-working car horn can pose safety concerns as it may prevent the driver from alerting others of their presence on the road. It is important to address any issues with the car horn promptly to ensure safe driving.
