
Connecting an external display to your MacBook can give you more room for apps, documents, video calls, editing tools, and browser tabs. The setup is usually simple, but the best cable, adapter, resolution, and display mode depend on your MacBook model and monitor. Before you plug everything in, check your MacBook’s ports and display limits so you avoid blank screens, flickering, or unsupported resolutions.
Quick Answer
To connect an external display to your MacBook, confirm your MacBook supports the monitor, choose the right cable or adapter, plug the display into power, connect it to your MacBook, then open System Settings > Displays to arrange screens, adjust resolution, and choose extended or mirrored mode.
Key Takeaways
- Check your exact MacBook model before buying a monitor, cable, adapter, or dock.
- Use HDMI, USB-C, Thunderbolt, DisplayPort, or Mini DisplayPort based on your MacBook and display ports.
- Use System Settings > Displays to arrange screens, change resolution, adjust scaling, and switch display modes.
- If the monitor does not work, check cables, power, input source, macOS updates, and display detection settings.
At a Glance
| Time Required | 5 to 15 minutes for most setups |
| Difficulty | Easy, unless you need a dock or multiple-display setup |
| Tools Needed | MacBook, external display, power cable, video cable, and any needed adapter or dock |
| Cost | Free if you already have the right cable; extra cost may apply for adapters, hubs, docks, or higher-quality cables |
Check Your MacBook’s Compatibility
Before connecting an external display to your MacBook, check your MacBook model, release year, ports, and supported display limits. Not every MacBook supports the same number of external monitors, maximum resolution, or refresh rate.
Start by selecting the Apple menu and opening About This Mac. Note the model name, chip, and release year. Then compare that information with the display you want to use. This matters most if you plan to use a 4K, 5K, 6K, ultrawide, high-refresh-rate, or multi-monitor setup.
Next, check the type of video connection your MacBook supports. Depending on the model, your ports may include USB-C, Thunderbolt 3, Thunderbolt 4, Thunderbolt 5, HDMI, or older Mini DisplayPort. Most modern MacBooks use USB-C-style Thunderbolt ports, while some MacBook Pro models also include a built-in HDMI port.
You should also compare your monitor’s input ports. Common options include HDMI, DisplayPort, USB-C, Thunderbolt, Mini DisplayPort, and VGA on older displays. HDMI is common on TVs and many monitors, while DisplayPort and Thunderbolt are often better for high resolutions or higher refresh rates.
Finally, make sure macOS is updated. Software updates can improve display compatibility, fix external monitor bugs, and add support for newer accessories. Open System Settings > General > Software Update to check for available updates.
Note: On older versions of macOS, display controls may appear under System Preferences > Displays instead of System Settings > Displays.
[Amazon Products Picked for You]
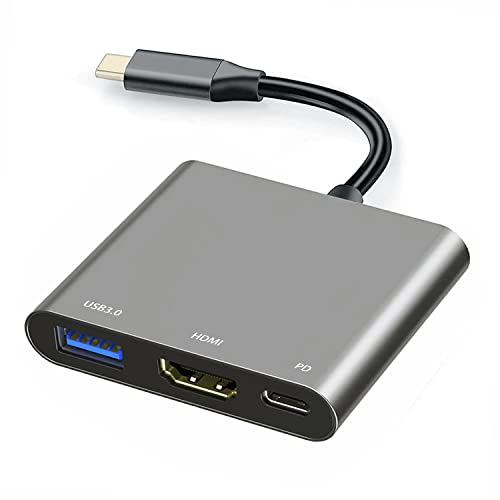
【Specification】Gray aluminum alloy shell LWH 60*55*10mm (2.3*2.1*0.4 inch), cable 130mm (0.5 inch), Mini size and multi-function.

The Anker Advantage: Join the 80 million+ powered by our leading technology.

【USB-C to HDTV Adapter 3-in-1 】 USB type-c to hdtv / usb-c/ usb 3.0 multiport adapter convenient for home-theater entertainment, office, exhibition, presentation, teaching etc. Good product solution allows you to charge faster, more stable and more HD, with perfect size to carry around in pocket
Gather the Necessary Cables and Adapters
Before you connect your external display, gather the correct cables and adapters. This step prevents most setup problems because the MacBook, cable, adapter, and monitor all need to support the same connection type and display quality.
Start by identifying the connections your MacBook and monitor require. Then choose compatible adapters if the ports do not match. Having these items ready makes the setup smooth and straightforward.
[Amazon Products Picked for You]

【4K UHD Visual Feast】This USB-C to HDMI cable supports up to 4K@60Hz resolution and is backward compatible with 1440P@60Hz and 1080P@120Hz. It can seamlessly transmit at 3840x2160 resolution, providing crystal-clear images and smooth video, suitable for high-definition monitors, TVs, and projectors, meeting the needs of various devices and use cases. 📌𝐍𝐨𝐭𝐞: 𝐔𝐒𝐁-𝐂 𝐩𝐨𝐫𝐭 𝐦𝐮𝐬𝐭 𝐬𝐮𝐩𝐩𝐨𝐫𝐭 "𝐃𝐢𝐬𝐩𝐥𝐚𝐲𝐏𝐨𝐫𝐭 𝐀𝐥𝐭𝐞𝐫𝐧𝐚𝐭𝐞 𝐌𝐨𝐝𝐞". 𝐍𝐎𝐓 𝐬𝐮𝐩𝐩𝐨𝐫𝐭 𝐏𝐨𝐫𝐭𝐚𝐛𝐥𝐞 𝐌𝐨𝐧𝐢𝐭𝐨𝐫 𝐨𝐫 𝐔𝐥𝐭𝐫𝐚 𝐖𝐢𝐝𝐞 𝐌𝐨𝐧𝐢𝐭𝐨𝐫.

[Effortless Plug & Play] Crystal-clear and vibrant 4K@60Hz resolution backward compatible for 1440P/2K@144Hz and 1080P@240Hz. Instantly mirror or extend UHD content from your Type-C phone, tablet, laptop, and desktop computer to larger displays like monitors, TVs, and projectors. Leave behind the worries of unstable WiFi and the hassle of drivers. HDCP compliance lets you enjoy media streaming without any limitations.𝗣𝗹𝗲𝗮𝘀𝗲 𝗡𝗼𝘁𝗲: 𝗧𝗵𝗶𝘀 𝗶𝘀 𝗮 𝗼𝗻𝗲-𝘄𝗮𝘆 𝗰𝗮𝗯𝗹𝗲, 𝗱𝗲𝘀𝗶𝗴𝗻𝗲𝗱 𝗲𝘅𝗰𝗹𝘂𝘀𝗶𝘃𝗲𝗹𝘆 𝗳𝗼𝗿 𝘁𝗿𝗮𝗻𝘀𝗺𝗶𝘀𝘀𝗶𝗼𝗻 𝗳𝗿𝗼𝗺 𝗨𝗦𝗕-𝗖 𝗵𝗼𝘀𝘁 𝗱𝗲𝘃𝗶𝗰𝗲𝘀 𝘁𝗼 𝗛𝗗𝗠𝗜 𝗱𝗶𝘀𝗽𝗹𝗮𝘆𝘀.
![BENFEI USB C to HDMI 6 Feet Cable [4K@60Hz, Aluminum Shell, Nylon Braided], USB Type-C to HDMI Cable [Thunderbolt 3/4/5] Compatible for MacBook Pro/Air/iPad Pro 2023/2022/2021/2020/2019, Gray](https://m.media-amazon.com/images/I/41iIt-R54KL._SL500_.jpg)
PLUG & PLAY- Stream 4K UHD content from your USB-C laptop(such as MacBook Pro/Air, Surface), tablet or phone to bigger display, like monitors, TV, project with HDMI input. No driver required, plug in and play. Supports resolutions up to 3840*2160@60Hz including, 2K@144Hz, 1080P, 720p, 1600x1200, 1280x1024 for high definition monitors or projectors;*Note: one-way cord, exclusively from USB-C host devices to HDMI displays.
Identify Required Connections
To successfully connect an external display to your MacBook, identify the right connection path. Your setup may use a direct cable, an adapter, a USB-C hub, or a full docking station.
- HDMI Cable: This is one of the most common ways to connect an external display. It supports video and audio, and it works well for many monitors, projectors, and TVs.
- USB-C to HDMI Adapter: If your MacBook has USB-C or Thunderbolt ports and your display uses HDMI, you will need this adapter or a USB-C hub with HDMI output.
- USB-C to DisplayPort Cable: This is a strong choice for many monitors, especially if you want higher refresh rates or a more reliable connection than some basic HDMI adapters provide.
- Thunderbolt Cable: Use this for Thunderbolt displays, USB-C monitors that support video input, or docking stations that connect multiple devices through one cable.
- Mini DisplayPort to HDMI Adapter: Older MacBook models with Mini DisplayPort may need this adapter to connect to newer HDMI displays.
With these items in hand, you will be ready to expand your MacBook’s visual workspace and improve your productivity.
Select Compatible Adapters
Having the right cables is only the beginning. To connect an external display to your MacBook, you may need compatible adapters that match your MacBook’s ports and your monitor’s input.
Check whether your MacBook has USB-C, Thunderbolt, HDMI, or Mini DisplayPort. If your external monitor uses HDMI and your MacBook only has USB-C-style ports, choose a USB-C to HDMI adapter that supports the resolution and refresh rate you want.
Do not ignore the display’s resolution. A low-quality adapter may connect successfully but limit your monitor to a lower refresh rate, cause flickering, or prevent full resolution. For example, a 4K monitor may require an adapter and cable that support 4K at the refresh rate you prefer.
You can find these adapters at electronics stores or online retailers. Choose well-reviewed cables and adapters from reputable brands because poor accessories can cause signal loss, random disconnections, no audio, washed-out colors, or display detection problems.
Pro Tip: If your monitor supports both HDMI and DisplayPort, try USB-C to DisplayPort first for a desktop monitor. It often works well for high-resolution and high-refresh-rate setups.
Connect the External Display
Now that you have gathered the necessary cables and adapters, it is time to connect your external display. Place the monitor where you want it on your desk before plugging everything in. This makes it easier to arrange the display layout later.
Plug the monitor into power and turn it on. Then connect the video cable to the monitor and to your MacBook, adapter, hub, or dock. If your monitor has several inputs, use the monitor’s menu buttons to choose the correct input source, such as HDMI 1, HDMI 2, DisplayPort, or USB-C.
After the cable is connected, your MacBook may detect the external display automatically. The screen may flash briefly as macOS adjusts the display output. If nothing appears, leave everything connected and continue to the display settings steps below.
Required Cables and Adapters
Connecting an external display to your MacBook requires specific cables and adapters that match both the display and your MacBook’s ports.
To guarantee a smoother connection, confirm these common components before you start:
- HDMI Cable: Many external displays use HDMI for video and audio. If your MacBook has an HDMI port, this is a straightforward option.
- USB-C or Thunderbolt Adapter: If your MacBook only has USB-C-style Thunderbolt ports, you may need an adapter to connect to HDMI or DisplayPort.
- Mini DisplayPort to HDMI Adapter: For older MacBook models with Mini DisplayPort, this adapter lets you connect to many modern displays.
Secure each connection without forcing the plug. If a cable does not fit easily, stop and confirm the port type. Forcing the wrong connector can damage the cable, adapter, or MacBook port.
Display Settings Configuration
Once you have gathered the appropriate cables and adapters, configure the display settings on your MacBook so the external display works correctly.
Start by connecting your external display to your MacBook. Once connected, open the Apple menu, then select System Settings. Choose Displays to access display controls.
Here, you can adjust resolution, brightness, refresh rate, color profile, and arrangement when those options are supported by your display. If you want to extend your desktop, arrange the display icons to match your desk setup. If you prefer both screens to show the same content, choose the mirroring option.
Your external display should now be ready for use. You can also explore options such as Night Shift or True Tone if your MacBook and display support them. These settings can make the screen more comfortable in some lighting conditions.
Configure Display Settings
After you successfully connect your external display to your MacBook, configure the display settings to optimize your workspace. This step helps you control how text looks, where windows open, and how your mouse moves between screens.
- Resolution: Open System Settings > Displays and adjust the resolution for the best clarity. Choose Default for a simple setup or Scaled if you want larger text or more workspace.
- Display Arrangement: In the Displays menu, set how your screens relate to each other. This makes it easier to move your pointer and drag windows between displays.
- Brightness and Color: Adjust brightness, color profile, Night Shift, and other visual settings to suit your room and reduce eye strain.
- Refresh Rate: If your monitor supports multiple refresh rates, choose the one that matches your needs. A higher refresh rate can make pointer movement and scrolling feel smoother.
- Sound Output: If your monitor has speakers, open System Settings > Sound and choose whether audio should play through the MacBook or the display.
Warning: If your screen flickers, turns black, or shows “no signal,” do not keep unplugging and replugging quickly. Check the input source, cable rating, adapter quality, and resolution settings first.
Arrange Your Displays
Arranging your displays correctly can greatly improve your workflow. When the on-screen layout matches the real position of your MacBook and monitor, your pointer moves naturally between screens.
To start, connect your external display and open System Settings. Click Displays, then look for the arrangement view. You should see your MacBook display and external display represented as separate boxes.
Drag these boxes to match their physical positions on your desk. For instance, if your external monitor is to the right of your MacBook, drag its box to the right. If the monitor sits above your MacBook, place it above the MacBook display in the arrangement view.
This setup helps your mouse move seamlessly between screens. It also makes window management easier because you can drag apps in the same direction as the real monitor.
Use mirroring if you want both screens to show the same content. This is helpful for presentations, teaching, screen sharing, or using a TV as a larger duplicate display. Use extended desktop mode if you want more workspace for different apps.
A good display arrangement saves time every day because your pointer, windows, and apps move exactly where your hands expect them to go.
Adjust Resolution and Scaling
Adjusting the resolution and scaling of your external display can greatly improve your visual experience. A well-calibrated display can make text easier to read, images sharper, and your workspace more comfortable.
Here’s how to get started:
- Open System Settings: Click the Apple menu, select System Settings, and choose Displays.
- Select Resolution: In the Displays menu, choose the external display. Select Default or choose a scaled option that fits your needs.
- Adjust Scaling: Pick larger text if readability matters most. Pick more space if you want to fit more windows, toolbars, or editing panels on the screen.
- Check Refresh Rate: If available, choose a refresh rate supported by both your monitor and cable. This option may not appear for every display.
- Review Color Settings: Choose a suitable color profile if you do photo, video, or design work. For casual use, the default profile is usually fine.
If text looks too small on a high-resolution monitor, do not lower the resolution immediately. Try scaling first. Scaling can keep the display sharp while making interface elements easier to see.
Troubleshoot Common Issues
External display problems can be frustrating, but many issues come from simple causes. Start with the basics before replacing the monitor, adapter, or cable.
First, check your cables and connections. Make sure everything is plugged in securely and that you are using the correct ports. Confirm the monitor is turned on and set to the right input source.
If the display is not recognized, open System Settings > Displays. If your macOS version offers a display detection option, use it while the monitor is connected. On some versions, holding the Option key in the Displays area may reveal extra detection controls.
If the screen is blank, try lowering the resolution or refresh rate. Some monitors fail to display an image if the selected setting is not supported through the current cable or adapter.
If the image flickers, looks blurry, or drops in and out, test a different cable. Avoid very long, damaged, or low-quality video cables. If you are using a hub, try connecting the display directly to the MacBook with a dedicated adapter.
If you still face problems, update macOS and restart your MacBook. You should also test the external display with another device to rule out hardware issues. If the monitor works with another computer, your adapter, cable, dock, or MacBook settings are more likely to be the cause.
[Amazon Products Picked for You]

Portable and powerful USB-C HUB: BENFEI USB Type-C HUB, with super-soft and knot-free silicone woven design cable, meets most mobile office needs. Compact, lightweight, stylish, and powerful portable USB C Hub equipped with 1 x HDMI port, 1 x 100W charging, and 3 x USB ports. 18-month warranty, 24-hour response, to ensure you feel at ease when using our product.

[ULTRA HD 4K@60Hz] Acer USB C to HDMI adapter supports resolutions up to 4K@60Hz and is backward compatible with 2K@144 Hz/60 Hz, which can away from visual fatigue caused by a low refresh rate. 📌𝐍𝐨𝐭𝐞: ①𝐎𝐧𝐥𝐲 𝐬𝐮𝐩𝐩𝐨𝐫𝐭 𝐔𝐒𝐁-𝐂 𝐭𝐨 𝐇𝐃𝐌𝐈 𝐮𝐧𝐢-𝐝𝐢𝐫𝐞𝐜𝐭𝐢𝐨𝐧𝐚𝐥 𝐭𝐫𝐚𝐧𝐬𝐦𝐢𝐬𝐬𝐢𝐨𝐧; ②𝐍𝐨𝐭 𝐬𝐮𝐩𝐩𝐨𝐫𝐭 𝐜𝐡𝐚𝐫𝐠𝐢𝐧𝐠

【Amazing 4K Visual Effects】The USB C to HDMI cable supports up to 3840*2160@60Hz resolution for extraordinary HDR visual clarity at smooth 60Hz in stunning 4k UHD resolution, with perfect audio pass-through to immerse you in true cinematic enjoyment. Backward compatible with 3840*2160@30Hz, 2K@120Hz, 1080P. Note: Please make sure that your USB-C device supports the video transmission function (DP Alt Mode). If you're not sure, please consult your device retailer or contact us
External Display Not Detected
If your MacBook does not detect the display, check power, cable direction, adapter compatibility, and monitor input. Some USB-C cables only support charging or data, not video. Use a cable that clearly supports video output.
Disconnect unnecessary accessories, then test the display again. If you use a dock, confirm that the dock supports video output for your MacBook model. Some docks support one display on certain MacBooks but not multiple displays.
Blurry Text or Wrong Resolution
Blurry text usually means the monitor is using the wrong resolution, a weak adapter, or a non-native scaling mode. Open System Settings > Displays, select the external display, and try the default resolution first.
If the display is a TV, check the TV’s picture settings. Disable overscan, motion smoothing, or sharpness effects if they make text look strange. Many TVs have a computer or PC mode that improves clarity.
No Sound From the Monitor
If your monitor or TV has speakers but audio still plays from the MacBook, open System Settings > Sound. Select the external display as the output device. Also check the monitor’s volume and mute settings.
Mouse Moves the Wrong Way
If your pointer moves in the wrong direction when switching screens, your display arrangement does not match your desk. Open System Settings > Displays and drag the display boxes until they match the real left, right, top, or bottom placement of each screen.
Frequently Asked Questions
Can I connect multiple external displays to my MacBook?
Yes, you can connect multiple external displays to some MacBook models, but support depends on the exact model, chip, ports, dock, and display resolution. Check your MacBook specifications before buying extra monitors or a multi-display dock.
What types of external displays are compatible with MacBooks?
MacBooks can work with many external displays, including LCD monitors, LED monitors, ultrawide monitors, projectors, Thunderbolt displays, USB-C monitors, and smart TVs. The display must use a compatible connection, such as HDMI, DisplayPort, USB-C, Thunderbolt, or an adapter that supports video output.
How do I switch between display modes?
Open System Settings > Displays and choose whether to extend your desktop or mirror your display. On some MacBooks and macOS versions, you can also use keyboard shortcuts or Control Center display options to change display behavior more quickly.
Will connecting a display affect my MacBook’s battery life?
Yes, connecting an external display can reduce battery life because your MacBook powers extra graphics output and may run brighter or warmer. For long work sessions, plug your MacBook into power and use energy-saving settings when needed.
Can I use a smart TV as an external display?
Yes, you can use a smart TV as an external display for your MacBook. Connect with HDMI for the most reliable setup, or use AirPlay if your TV supports it. For sharper text, enable the TV’s computer or PC mode if available.
Why is my external monitor not showing full resolution?
Your monitor may not show full resolution if the cable, adapter, dock, or MacBook port does not support it. Try a higher-quality cable, connect directly instead of through a hub, and check System Settings > Displays for scaled resolution options.
Do I need a docking station to connect an external display?
You do not always need a docking station. A single monitor often works with one cable or adapter. A dock becomes useful when you want multiple displays, charging, Ethernet, USB accessories, SD cards, and audio connected through one cable.
Conclusion
Connecting an external display to your MacBook can transform your workspace and make multitasking much easier. Start by checking your MacBook’s compatibility, then choose the right cable, adapter, or dock for your monitor.
Once connected, use System Settings > Displays to arrange your screens, adjust resolution, set scaling, choose mirrored or extended mode, and fine-tune the viewing experience. If something goes wrong, check power, input source, cables, adapters, software updates, and resolution settings before assuming the display is faulty.
With the right setup, your MacBook can become a more flexible workstation for writing, editing, research, video calls, entertainment, and creative projects.
Sources
- Apple Support: Connect a display, TV, or projector to Mac — supports the general connection process and display setup steps.
- Apple Support: Use one or more external displays with Mac — supports external display arrangement and multi-display guidance.
- Apple Support: Change Displays settings on Mac — supports resolution, scaling, brightness, and display settings guidance.
- Apple Support: Use AirPlay to stream what’s on your Mac — supports smart TV and AirPlay display options.
