
A noisy Toyota RAV4 can make highway trips tiring, but adding insulation should not be your first move. Begin by identifying whether the sound comes from the tires, wind, trim, powertrain or a mechanical fault. Once you know the source, you can choose a repair or sound-control treatment that addresses the actual problem.
Some improvements cost little, such as correcting tire pressure or replacing a loose trim clip. Treating doors, the cargo floor and rear wheel arches takes more work, but it can reduce panel vibration and make normal road noise less intrusive.
Quick Answer
To make a Toyota RAV4 quieter, first check tire pressure, tread wear, wheel balance, seals and loose trim. Then treat vibrating panels with butyl damping material and add an automotive acoustic absorber where space allows. Quieter touring tires may help, but do not use insulation to hide a new mechanical noise.
Key Takeaways
- Diagnose the sound before buying materials. Tire, bearing, exhaust and trim problems require different fixes.
- Set cold tire pressure to the driver-door placard and inspect the tread for uneven wear.
- Butyl damping sheets control metal-panel vibration, while fibrous absorbers reduce reflected sound inside cavities.
- Never cover water drains, wiring, fasteners, latch parts, ventilation paths or airbag deployment areas.
- Results vary by model year, tire, road surface, speed and the area treated. Avoid universal decibel or percentage promises.
At a Glance
| Time Required | 30–60 minutes for diagnosis; several hours for one treatment area; a full-cabin project may take a day or longer |
| Difficulty | Easy for tire and seal checks; moderate for door and cargo trim; advanced near safety systems or fixed interior panels |
| Tools Needed | Tire-pressure gauge, flashlight, trim-removal tools, suitable screwdrivers or sockets, gloves, cleaner, scissors or a knife and an application roller |
| Cost | Low for diagnosis, clips and seal care; moderate for selected panels; moderate to high for tires, heavy barriers or professional full-cabin work |
What Makes the RAV4 So Loud?

The amount of noise you hear in a RAV4 depends on its model year, trim, powertrain, tires, accessories and road surface. A gasoline model under strong acceleration may sound different from a hybrid cruising at a steady speed. Different RAV4 generations also use different interior panels and insulation, so one treatment plan does not fit every vehicle.
Tires are often a major source of steady highway noise. Tread design, inflation pressure, irregular wear and coarse pavement can all change the sound entering through the floor and rear wheel areas.
Wind can become more noticeable as speed rises, especially when a weather seal is dirty, damaged or out of position. Roof racks, crossbars and other exterior accessories can also create turbulence.
Interior rattles usually come from loose clips, wiring, cargo-floor parts or trim panels touching each other. Normal powertrain sound may enter through the floor and firewall, but a new knock, exhaust sound or sudden increase in noise requires diagnosis rather than insulation.
Note: Use the Toyota manual for your exact model year before removing panels or disconnecting vehicle components. Fastener locations, electrical systems and safety equipment can differ.
Common Sources of Noise in the RAV4
Drive on a familiar route with the radio and climate fan turned down. Note the speed, pavement and driving condition that produces the sound. A repeatable test makes it easier to separate normal cabin noise from a fault.
| What You Hear | Useful Check | Likely Next Step |
|---|---|---|
| Roar that changes with pavement | Inspect tire pressure, tread pattern and uneven wear | Correct pressure and have tires, balance and alignment checked |
| Humming or growling that rises with vehicle speed | Note whether it changes during gentle left or right turns | Arrange professional tire and wheel-bearing diagnosis |
| Whistle or rushing air at highway speed | Inspect door seals, window channels, crossbars and exterior trim | Clean, reseat or replace the faulty part before adding insulation |
| Buzz or rattle over bumps or during bass notes | Press lightly on nearby trim while parked or have a passenger locate it safely | Replace clips and isolate touching parts with automotive foam or cloth tape |
| Noise that follows engine speed | Compare idle, gentle acceleration and heavy acceleration | Have abnormal tapping, knocking or exhaust noise inspected |
Warning: Do not cover a new humming, vibration, scraping, knocking or exhaust sound with insulation. The National Highway Traffic Safety Administration advises having tire noise or vibration inspected because it may indicate a tire-performance problem.
Top Sound Deadening Solutions for Your RAV4
A quiet installation normally uses more than one type of material. Each product controls a different part of the noise problem, so piling several layers onto every panel can add cost and weight without producing the expected result.
[Amazon Products Picked for You]

Choose the Coverage That Fits Your Project: Includes 8pcs/8.7 sqft total coverage area (each 9.8" × 15.7", 197mil / 5mm thickness)—easy to plan coverage and start small upgrades. Need a different thickness or coverage area? Choose from 4mm / 5mm / 10mm thickness, with coverage options of 1 roll/19 sq ft, 2 roll/38 sq ft, 12pcs/13.1 sq ft, 15pcs/16.3 sq ft, or 34pcs/37.1 sqft—pick the right sound deadening mat for your build.

Car sound deadener (10-piece) for creating a quieter and more comfortable in-car experience

Very sticky self-adhesive 80 mil automotive butyl and foil sound deadening. It is user-friendly viable material suitable for DIY installation. KILMAT is really efficient and easy-to-install
Effective Sound Deadening Materials
Butyl vibration damper uses a dense butyl layer with a foil facing. Products such as Kilmat, Noico and Damplifier Pro fall into this general category. They reduce resonance in thin metal panels and work best when rolled firmly onto clean metal.
Automotive acoustic absorber uses fibrous material to absorb sound inside a cavity. For example, 3M Thinsulate Acoustic Insulation is designed for automotive areas such as door panels, headliners, wheel wells and pillars. It is not a substitute for a butyl vibration damper.
Mass-loaded vinyl is a flexible, heavy barrier that can reduce airborne sound when installed with good coverage and a suitable decoupling layer. Products such as Luxury Liner Pro use this barrier approach. The extra weight and thickness make it more practical under cargo flooring than inside a tightly packed door.
Closed-cell foam or automotive cloth tape isolates trim pieces that rub, buzz or tap. It is useful around clips, wire-contact points and panel edges, but a thin foam sheet alone will not block low-frequency road noise.
FatMat and similar retail products may also be available, but compare the material type, weight, thickness, temperature rating and manufacturer instructions instead of choosing by brand name alone.
Key Installation Techniques
- Clean and dry the metal before applying adhesive material.
- Use a roller to remove air pockets and secure the edges.
- Start with broad, flexible metal areas instead of covering every surface automatically.
- Use small foam pieces only where trim parts touch or wiring may rattle.
- Keep material away from water drains, wiring connectors, latch rods, speakers and service openings.
- Preserve the factory moisture barrier and reseal it properly.
- Confirm that every clip, screw and electrical connector is secure before closing the panel.
Do not place ordinary cabin insulation under the hood unless the manufacturer specifically approves it for the temperature, fluid exposure and fire-safety requirements of that location.
Pro Tip: Treat one area first, then repeat your baseline drive. This shows whether the chosen area was responsible for the noise and prevents unnecessary weight from being added elsewhere.
Step-by-Step Installation of RAV4 Sound Deadening
[Amazon Products Picked for You]

Very sticky self-adhesive 80 mil automotive butyl and foil sound deadening! It is user-friendly viable material suitable for DIY installation. KILMAT is really efficient and easy-to-install.

Effective Noise Reduction -- The GOSCHE Sound Deadening Material significantly reduces road and engine noise, creating a quieter cabin by absorbing vibrations and blocking external sounds. Perfect for a more peaceful driving experience

Very sticky self-adhesive 50 mil (1.3 mm) automotive butyl and foil sound deadening! It is user-friendly viable material suitable for DIY installation. KILMAT is really efficient and easy-to-install.
1. Prepare and Record a Baseline
Remove loose items from the doors, glove box and cargo area. Check the spare-tire tools, cargo-floor panels and rear-seat hardware because loose objects can imitate road or suspension noise.
Drive the same route at a consistent speed. Record where the sound appears and whether it changes with pavement, engine load, steering input or crosswinds. A phone recording can help with comparison, but it is not a calibrated sound-level test.
2. Check Tires, Seals and Trim First
Set the cold tire pressure to the value shown on the driver-door placard, not the maximum pressure printed on the tire sidewall. Inspect the tread for cupping, feathering, damage or uneven wear.
Clean the door weatherstrips with a product that is safe for automotive rubber. Check for torn, flattened or displaced sections. Replace broken trim clips before adding damping material.
3. Remove the Door Panel Safely
Park on level ground, turn the vehicle off and keep the key away from the work area. Follow the removal and electrical-safety procedure for your exact RAV4 year.
Use plastic trim tools and the correct screwdriver or socket. Support the panel as it comes free, then disconnect electrical plugs by their locking tabs rather than pulling on the wires.
Warning: Stop if the work exposes an SRS connector, airbag component or deployment path. Do not cut, drill or attach material near safety-system wiring. Use a qualified automotive technician when the required procedure is unclear.
4. Protect the Moisture Barrier
Peel the factory moisture barrier back only as far as needed. Avoid stretching or tearing it. Keep the original sealant clean so the barrier can be resealed around its full edge.
Do not block drain slots at the bottom of the door. Water must be able to leave the door shell after rain or washing.
5. Apply Vibration-Damping Material
Cut the butyl damping sheet into manageable pieces. Round sharp corners, position each piece on clean metal and press it down with a roller.
Focus on broad metal sections that produce a hollow ring when tapped. Leave clearance for the window mechanism, cables, latch rods, speaker and fasteners.
6. Add Absorption and Rattle Control
Place a suitable automotive acoustic absorber in open trim cavities without compressing it into moving parts. Use small pieces of closed-cell foam or cloth tape where plastic parts or wires may contact the panel.
Check panel clearance before adding a thick layer. Excess material can prevent clips from engaging or place pressure on window and lock mechanisms.
7. Reassemble and Test
Reconnect every electrical plug, align the panel and press each clip into place. Replace clips that no longer hold securely, then reinstall the screws and trim covers.
Test the locks, windows, mirror controls and speakers before driving. Repeat the original route and compare the same speed, road and climate-fan setting.
8. Treat the Cargo Area and Rear Wheel Arches
If most noise comes from behind the rear seats, remove loose cargo and inspect the cargo-floor components first. Treat exposed resonant metal with butyl damping material, then add an absorber or decoupled barrier where it will not interfere with wiring, ventilation or removable service panels.
Rear wheel-arch areas can transmit tire impact and road texture. Use materials intended for automotive interiors and secure them so they cannot rub against wiring or prevent trim from fitting correctly.
Upgrade Your RAV4 Tires for a Quieter Ride

Before replacing usable tires, check pressure, balance, alignment and tread condition. Irregular wear can make a normally quiet tire sound rough, and new tires will not stay quiet if the underlying alignment or suspension issue remains.
When replacement is due, look for a touring or highway-oriented tire available in the correct size, load index and speed rating for your RAV4. Compare wet braking, winter suitability, tread life, rolling resistance and ride comfort instead of selecting a tire solely from a “quiet” marketing claim.
All-terrain tread usually produces more pattern noise than a road-focused touring tread. However, the right choice depends on where you drive. A driver who regularly uses snow, gravel or unpaved roads should not trade necessary traction for a small comfort gain.
Ask the installer to confirm wheel balance and inspect the alignment and suspension if the previous tires show uneven wear. After installation, keep the tires at the cold pressure listed on the vehicle placard.
A quieter tire cannot correct a worn bearing, damaged tread, poor alignment or loose suspension part. Diagnose the noise before replacing parts.
[Amazon Products Picked for You]
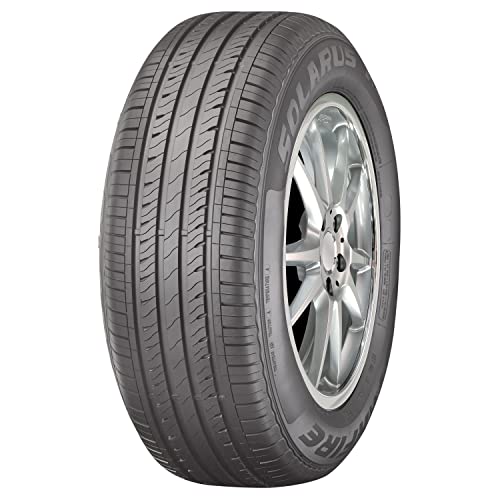
50,000 mile warranty

Product Type :Vehicle Tire

Insulation Techniques for a Quieter RAV4 Cabin
Place each material where it can perform its intended job. A vibration damper belongs directly on resonant sheet metal. A fibrous absorber belongs inside a protected cavity, while a heavy barrier needs broad coverage and enough room to lie flat.
| Area | Main Concern | Suitable Treatment | Important Caution |
|---|---|---|---|
| Doors | Panel resonance, wind noise and rattles | Butyl damper, automotive absorber and small decoupling strips | Preserve drains, window movement, latches and moisture barrier |
| Cargo floor | Rear tire and road noise | Butyl damper plus absorber or decoupled barrier | Keep service panels, wiring and ventilation accessible |
| Rear wheel arches | Tire impact and coarse-road sound | Damper on resonant metal and absorber behind trim | Do not trap moisture or interfere with wiring |
| Floor and firewall | Road and powertrain sound | Damper with a properly installed barrier system | Professional work is safer near pedals, seats, wiring and safety systems |
| Plastic trim | Buzzing and contact rattles | Automotive cloth tape or thin closed-cell foam | Do not make the panel too thick to seat correctly |
Layering Damplifier Pro, Kilmat, Noico, Luxury Liner Pro or another product does not guarantee a fixed noise reduction. Coverage, installation quality and the original noise source matter more than the number of brand names used.
The Importance of Door Panel Sealing
The factory door system manages water, air movement, wiring and moving hardware. A quieter door should still perform all of those jobs after the trim is reinstalled.
Benefits of Sealing Doors
Replacing a damaged weatherstrip can reduce a localized wind leak. Resealing the factory moisture barrier can also prevent air movement and water intrusion behind the interior trim.
Butyl damping material on broad metal sections can reduce the hollow sound produced by panel resonance. An absorber behind the trim may reduce reflected sound, while thin foam or cloth tape can stop clips and wires from buzzing.
Do not seal every opening in the metal door shell. Some openings provide drainage, access or clearance for moving parts.
Techniques for Effective Sealing
Use the following checks when reinstalling a treated door:
| Technique | How to Apply It | Benefit |
|---|---|---|
| Apply butyl material selectively | Roll it onto clean, broad metal sections while leaving mechanisms clear | Reduces panel resonance |
| Reseal the moisture barrier | Restore the continuous factory seal without blocking drains | Limits air leaks and protects interior trim from moisture |
| Replace damaged clips | Use the correct clip size and confirm that each position locks | Prevents loose-panel rattles |
| Isolate contact points | Use thin automotive foam or cloth tape where parts touch | Stops buzzing without overpacking the panel |
| Inspect weatherstrips | Clean the seal and replace torn, flattened or displaced sections | Corrects genuine wind leaks |
Real-World Results: How Soundproofing Changes the RAV4
A successful treatment should reduce the specific noise you targeted without causing new rattles, electrical faults, water leaks or poorly fitting trim. The result may be easy to notice even when a phone application cannot measure it accurately.
Do not promise a universal 3–5 dB or 50–60% improvement. Decibels use a logarithmic scale, and test results change with speed, pavement, wind, tire temperature, microphone position and background noise. The NIOSH explanation of noise measurement shows why percentage comparisons can be misleading.
For a useful comparison, drive the same route before and after the work. Use the same lane, speed, tire pressure, climate-fan setting and microphone location. Make separate notes for smooth pavement, coarse pavement, acceleration and crosswinds.
If the treatment reduces tire roar but wind becomes more noticeable, the work may still have succeeded. Lowering one source can reveal another sound that was already present.
The most useful result is not a promised percentage. It is a repeatable reduction in the specific noise that bothered you, with every vehicle system still working correctly.
Assess the Costs of Noise Reduction Upgrades

The total cost depends on the RAV4 year, treatment area, material weight, number of trim clips replaced and local labor rate. Exact prices become outdated quickly, so compare the scope of each option rather than relying on a fixed universal figure.
| Upgrade | Cost Level | Best For | Main Tradeoff |
|---|---|---|---|
| Pressure, tread, loose-item and seal inspection | Low | Finding maintenance problems before modifying the vehicle | Will not change normal panel resonance by itself |
| Clips, cloth tape and small foam treatments | Low | Buzzes and trim rattles | Requires accurate rattle location |
| One-door or cargo-area treatment | Moderate | A known local source of vibration or road noise | May make untreated areas more noticeable |
| Four-door and rear wheel-arch treatment | Moderate to high | Broad road-noise and panel-resonance concerns | More labor, material and added weight |
| Quiet-oriented replacement tires | Moderate to high | Worn or unsuitable tires that already require replacement | Noise performance varies by road and may compete with traction priorities |
| Professional full-cabin barrier system | High | Owners seeking extensive treatment without DIY trim removal | Highest labor cost, added weight and greater disassembly |
Ask a professional installer to itemize the treated areas, material types, approximate added weight, clip replacement and workmanship warranty. A detailed quote is more useful than a single package name.
Related Guides
Frequently Asked Questions
Will soundproofing affect my RAV4’s warranty?
Aftermarket soundproofing does not automatically cancel the entire vehicle warranty. However, a warranty claim may be denied when damage was caused by the material, installation or modification. The FTC’s auto-warranty guidance explains this distinction. Keep receipts, photograph the installation and avoid altering safety equipment or factory wiring.
How long does sound-deadening installation take?
A diagnostic inspection may take less than an hour. Treating and reassembling one accessible area can take several hours, while four doors, the cargo floor and wheel arches may require a full day or longer. Model year, experience, damaged clips and adhesive cleanup can change the schedule.
Can I soundproof a Toyota RAV4 myself?
You can handle tire checks, loose cargo, simple trim rattles and some door or cargo-area treatments if you are comfortable removing automotive trim. Stop and use a professional when the work involves SRS parts, fixed flooring, seats, pedals, complex wiring or a procedure that is unclear in the model-year documentation.
Which sound-deadening brand is best for a RAV4?
Choose by material function rather than brand alone. Use a butyl vibration damper for resonant metal, an automotive absorber for protected cavities, a decoupled barrier where broad coverage and space are available and thin foam or cloth tape for contact rattles. Compare technical sheets, weight, temperature limits, flammability information and installation instructions.
Will soundproofing improve my RAV4’s fuel efficiency?
No. Reducing cabin noise does not make the engine more efficient. A small, lightweight installation may produce no noticeable mileage change, but a heavy full-cabin treatment adds weight and can slightly reduce fuel economy. The U.S. Department of Energy notes that added vehicle weight can reduce efficiency.
What should I check before buying sound-deadening material?
Check cold tire pressure, tread condition, wheel balance, alignment, weatherstrips, roof accessories, loose cargo and trim clips. Have any sudden humming, vibration, scraping, knocking or exhaust noise diagnosed. Buy material only after you can identify the area and type of noise you need to control.
Conclusion
You can make a Toyota RAV4 quieter, but the best results come from fixing the correct source in the correct order. Start with tires, seals, loose trim and mechanical diagnosis. Then use vibration damping, acoustic absorption, barriers and rattle-control materials only where each one provides a clear benefit.
Work one area at a time, preserve the vehicle’s drains and safety systems and repeat the same test drive after each stage. This approach produces a more dependable improvement than covering the entire interior and relying on an unsupported noise-reduction percentage.
Sources
- Toyota Manuals and Warranties — year-specific vehicle procedures and safety information
- NHTSA TireWise — tire pressure, condition, noise and vibration guidance
- Federal Trade Commission: Auto Warranties and Service Contracts — aftermarket parts and warranty coverage
- 3M Thinsulate Acoustic Insulation Technical Data Sheet — automotive acoustic-absorber applications
- U.S. Department of Energy Gas-Saving Tips — added weight and fuel economy
- NIOSH Noise and Hearing Loss Guidance — decibel measurement and logarithmic sound levels
