Air trapped in a cooling system can cause hot spots, overheating, poor heater performance, and confusing temperature-gauge swings. This guide shows you how to spot air-pocket symptoms, prepare safely, bleed the system with or without a bleed screw, use a vacuum-fill kit when available, and confirm the repair after the engine cools.
Quick Answer
To bleed a car’s cooling system, start with a completely cool engine. Top up the reservoir, set the heater to max, and run the engine while slowly opening any bleed screw at the system’s high point until coolant flows bubble-free. Keep fluid at the full mark and recheck for leaks after cooling.
Key Takeaways
- Only open caps or bleed screws on a cool engine because hot cooling systems can be pressurized and dangerous.
- Air in the coolant can cause fluctuating temperatures, gurgling heater noise, poor cabin heat, and possible overheating.
- Vacuum-fill tools remove air quickly, help fill the system more evenly, and can reveal leaks before refilling.
- After bleeding, recheck the coolant level cold and inspect for leaks over several drives.
At a Glance
| Time Required | 30 to 90 minutes, depending on the vehicle, coolant level, and whether you use a vacuum-fill kit. |
| Difficulty | Beginner to moderate. The task is simple, but the safety risk is high if the engine is hot. |
| Tools Needed | Correct coolant, funnel or spill-free funnel, rags, catch pan, gloves, eye protection, basic hand tools, and a vacuum-fill kit if available. |
| Cost | Usually low if you already have coolant and basic tools. A vacuum-fill kit adds cost but can save time on stubborn systems. |
Why bleeding the cooling system matters
The cooling system keeps engine temperature in a safe range by moving coolant through the engine, radiator, thermostat, hoses, and heater core. When air gets trapped inside that loop, coolant may not flow evenly. Air pockets can insulate hot metal surfaces, interrupt circulation, and create hot spots that trigger overheating.
Modern engines often use compact coolant passages, pressurized reservoirs, electric fans, and complex heater circuits. That design makes proper deaeration important after any cooling-system service, including a coolant flush, radiator replacement, thermostat replacement, hose repair, water-pump repair, or coolant-level correction after a leak.
Warning: Never remove a radiator cap, reservoir cap, or bleed screw when the engine is hot. Pressurized coolant can spray out and cause serious burns.
Signs that your car’s cooling system needs to be bled
Common indicators include an erratic temperature gauge, overheating, frequent coolant top-offs, and gurgling or bubbling noises from the radiator, reservoir, or heater core. A heater that blows cold at idle and warms only at higher RPM can also indicate trapped air in the heater core.
You may also notice the coolant level dropping after the first drive following a repair. That can happen when trapped air finally moves into the reservoir and coolant replaces it. A small one-time level change can be normal after service, but repeated coolant loss points to a leak or another fault.
- Temperature swings: The gauge rises and falls instead of staying steady.
- Poor cabin heat: The vents blow cool air even after the engine warms up.
- Gurgling sounds: You hear sloshing or bubbling behind the dashboard.
- Overheating after service: The problem starts after a coolant flush, hose replacement, radiator job, or thermostat replacement.
- Coolant level changes: The reservoir drops after cooling, even when you recently topped it off.
Preparing your car for the bleeding process
Let the engine cool completely before you begin. Waiting at least 30 minutes after driving helps, but some vehicles stay hot much longer. The safe rule is simple: do not open the system until the radiator hoses, cap area, and reservoir feel cool to the touch.
Gather a funnel, rags, a catch pan, gloves, eye protection, and, if available, a vacuum-fill or bleeding kit. Check your vehicle’s service manual for model-specific steps, bleed-screw locations, heater settings, cap style, and the correct coolant type. Using the wrong coolant can create corrosion, deposits, or poor long-term protection.
Safety note: Never open a radiator cap or reservoir on a hot engine. If the cap must be opened after the system has cooled, use a thick cloth and turn slowly to the first detent to release any residual pressure.
Before you start
- Park on level ground unless your vehicle’s service procedure says to raise the front slightly.
- Set the parking brake and keep the transmission in Park or Neutral.
- Confirm the coolant mixture matches your vehicle’s required type and concentration.
- Inspect hoses, clamps, the radiator, the reservoir, and the water pump area for obvious leaks.
- Keep pets and children away from the work area because coolant can be toxic.
Identifying the bleed valves in your cooling system
Bleed points are usually placed at high spots where air collects. Common locations include the thermostat housing, upper radiator hose area, radiator high point, and heater lines. Some vehicles do not have a dedicated bleed screw and must be bled through warming cycles, a spill-free funnel, careful hose burping, or a vacuum-fill tool.
Do not force a bleed screw that feels stuck. Small plastic screws can break easily, and some metal screws can seize from age or corrosion. If a bleeder looks damaged, leaking, or rounded off, repair it before you rely on it for bleeding.
| Bleed valve location | Function | Signs of malfunction |
|---|---|---|
| Radiator (high point) | Releases trapped air during warm-up | Coolant seepage, overheating |
| Thermostat housing | Allows air to escape on fill | Engine running hot, coolant weep at housing |
| Heater core line | Purges air from heater circuit | No cabin heat, gurgling, coolant odor |
[Amazon Products Picked for You]

【Compatibility Range】: This screw has an OEM number of 17111712788. It is only compatible with some specific vehicles and years, such as the X3, X5, Z3, Z4, 325i, 328i, 525i, 528i and more. You can view all the complete details on the description page. To ensure fitment, please check before purchasing.

【Replacement Part Number】This brass radiator drain plug is a direct replacement for original equipment manufacturer part #17111712788. Precision-engineered to original equipment manufacturer specifications, it seamlessly fits your vehicle's cooling system and delivers reliable performance. No modification required

【Upgraded Material】: Our engine coolant bleeder screw has been upgraded from plastic material to brass on the basis, which solves the disadvantages of plastic corrosion and softness, so you no longer have to worry about deformation during disassembly. Brass material works perfectly and has a long service life
Steps to bleed air from your car’s cooling system
Use this general process only when it matches your vehicle’s service procedure. Some vehicles need a scan tool to command electric pumps or valves, while others have a specific order for opening bleed points. When your manual gives a different sequence, follow the manual.
- Start cold. Park level, set the parking brake, and verify coolant is at the full cold mark. If your vehicle has a radiator cap, check the radiator level only when the engine is fully cool.
- Set the heater to max heat and fan. This helps move coolant through the heater core on many vehicles. Some newer vehicles use electronic blend doors or valves, so follow the manual if it gives a specific HVAC setting.
- Open the bleed screw if equipped. Place a pan underneath. Open it slowly and only enough to let air escape. Do not remove it completely unless the service procedure tells you to.
- Start and idle. As the engine warms, crack the bleed screw until air hisses out. Keep the reservoir topped up so the system does not draw in more air.
- Watch for bubble-free flow. When a steady stream of coolant with no bubbles emerges, tighten the screw to the proper snug fit or specified torque.
- Stabilize the system. Let the engine reach operating temperature. Briefly hold 1,500 to 2,000 RPM to help move coolant through the heater and radiator circuit.
- Confirm fan and heater operation. Watch for the cooling fan to cycle if conditions allow, and check that the cabin heater blows steady warm air.
- Cool and recheck. Shut the engine off, allow it to cool fully, then top off the radiator or reservoir to the full cold line.
Note: Some OEMs specify different sequences, special bleed points, electric pump activation, or scan-tool steps. Always follow your vehicle’s service procedure when it differs from this general guide.
How to bleed a cooling system without a bleed screw
If your vehicle has no bleed screw, you can often purge air through the radiator neck or reservoir using a slow warm-up process. A spill-free funnel helps because it keeps coolant above the fill point, giving air a place to escape without pulling more air back into the system.
- Start with a cold engine. Fill the radiator or reservoir to the correct cold level.
- Install a spill-free funnel if the system allows it. Add enough coolant to keep the funnel partly full.
- Turn the heater to max heat. Let the engine idle and warm gradually.
- Watch for bubbles. Small bubbles may rise as the thermostat opens and coolant begins moving through the full system.
- Gently squeeze the upper radiator hose. Use care around belts, fans, and hot parts. This can help move trapped air toward the fill point.
- Wait for steady heat and stable temperature. Once bubbling stops and the heater stays warm, shut the engine off.
- Cool fully and adjust the level. Remove the funnel only after the system cools enough to handle safely, then set the final cold level.
Pro Tip: If the heater stays cold after several warm-up cycles, do not keep driving and hoping the air clears. Recheck the fill procedure, look for leaks, and consider a vacuum-fill tool or professional bleed.
[Amazon Products Picked for You]
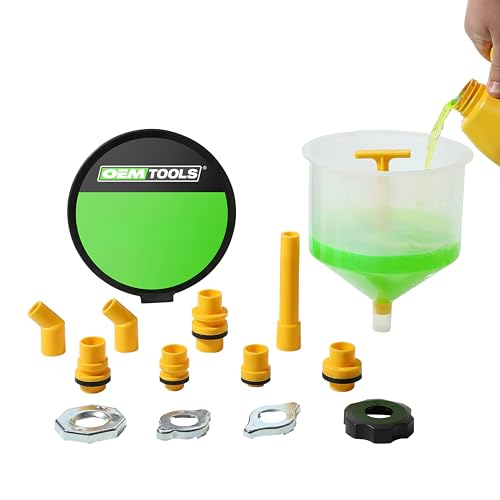
Prevents Spills: The no spill coolant funnel kit prevents spills and eliminates air bubbles during radiator refills, making it perfect for a clean, hassle-free coolant flush job.

The new clear funnel allows a quick visual check of the coolant from across the shop. Comes with a lid to keep contaminants out as well as store the caps and adapters.

Allows color matching of caps for dedicated adapters.
Using a bleeding/vacuum-fill kit
Vacuum-fill tools evacuate air and quickly back-fill the system with coolant. They can improve deaeration and help reveal leaks before you refill. Follow the tool’s manual precisely. Many systems fill in a few minutes if they hold vacuum. If vacuum drops, inspect for leaks before refilling.
A vacuum-fill kit usually connects to the radiator neck or reservoir opening. Shop air creates vacuum inside the cooling system, then the tool draws premixed coolant into the system. This method is especially helpful on vehicles with long heater hoses, rear heater cores, complex coolant routing, or stubborn air pockets.
See a typical Airlift-style vacuum-fill instruction sheet for general steps and cautions.
[Amazon Products Picked for You]

Cut Down Refill Time: Orion Motor Tech's 13 pc. coolant vacuum refill kit fills your system in just 10 minutes, eliminating the hassle of manual air bleeding. Simply pair it with an air compressor to get your vehicle back on the road faster
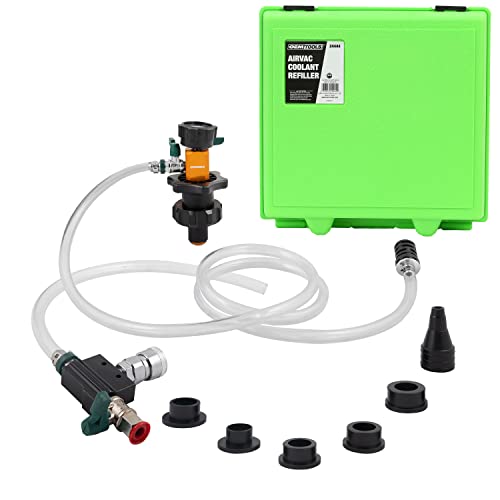
Efficient Cooling System Refill: The OEMTOOLS 24444 cooling system pressure tester kit quickly refills your vehicle's cooling system while eliminating trapped air, preventing engine damage.

Cut Down Refill Time: Orion Motor Tech's 13 pc. coolant vacuum refill kit fills your system in just 10 minutes, eliminating the hassle of manual air bleeding. Simply pair it with an air compressor to get your vehicle back on the road faster
When a vacuum-fill kit makes sense
- You replaced a radiator, water pump, thermostat, heater core, or major hose.
- The vehicle has repeated air-pocket symptoms after normal bleeding.
- The cooling system has several high points or hard-to-reach bleed areas.
- You want to check whether the system holds vacuum before adding coolant.
Tips to prevent air from entering again
Air usually enters the cooling system because the coolant level dropped, the system was opened for service, or a leak allowed air to replace lost coolant. Preventing future air pockets starts with keeping the system sealed and filled correctly.
- Fix leaks promptly, including hoses, clamps, radiator seams, reservoir cracks, water-pump seepage, and cap problems.
- Use the exact coolant type and specification for your vehicle.
- Use the proper coolant mix unless your coolant comes premixed.
- Follow the OEM fill and bleed procedure after any cooling-system service.
- Pressure-test the system after repairs to catch small leaks early.
- Replace a weak radiator cap or pressure cap if it no longer holds pressure correctly.
- Check the reservoir level cold over the next few drives after service.
Industry guidance exists for filling and deaeration practices, including the SAE J1436 overview.
Post-bleed checks: leaks and other issues
Inspect all hose joints and components for dampness. Monitor the gauge while idling and during a short test drive that includes stop-and-go driving and steady cruising. Recheck the coolant level cold over the next few trips. Persistent overheating, white exhaust smoke, or rapid coolant loss warrants professional diagnosis.
For roadside overheating safety and immediate actions, see AAA’s guidance on overheating vehicles.
What good results look like
- The temperature gauge rises normally and then stays steady.
- The heater blows consistent warm air at idle and while driving.
- No bubbles continue to appear in the reservoir after the system stabilizes.
- No coolant odor, damp hose ends, or fresh drips appear after the test drive.
- The cold coolant level remains stable after several heat cycles.
What means the problem is not solved
- The engine still overheats after a correct bleed.
- The coolant level keeps dropping with no obvious explanation.
- The heater still blows cold or changes temperature at idle.
- You see white exhaust smoke, milky oil, or repeated bubbles in the reservoir.
- The system pushes coolant out of the overflow repeatedly.
Refilling with coolant after bleeding
Confirm all bleed screws are snug. Using a funnel, fill the radiator or reservoir to the proper mark with the correct coolant. Run the engine until warm with the heater on, then cool completely and recheck the level. Top off to the full cold line.
Do not overfill the reservoir. Coolant expands as it heats, so the reservoir needs space above the cold mark. If you fill beyond the correct mark, the system may push extra coolant out during normal operation, which can look like a new leak.
Coolant handling tips
- Use only clean coolant from a sealed container or clean drain pan.
- Do not mix unknown coolant types unless the product and vehicle manual allow it.
- Wipe spills quickly because coolant residue can attract pets and damage surfaces.
- Dispose of old coolant according to local rules. Do not pour it onto the ground or into a storm drain.
Testing to ensure proper function
At operating temperature, verify stable gauge behavior and steady cabin heat. During your test drive, watch for sudden spikes, warning lights, steam, coolant smells, or a heater that turns cold at idle. If symptoms remain, repeat bleeding or investigate for stuck thermostats, weak water pumps, clogged radiators, restricted heater cores, failed pressure caps, or head-gasket issues.
After the test drive, park on a clean surface and let the vehicle cool fully. Check underneath for drips. Then check the reservoir level again. A small adjustment after the first heat cycle may be normal, but the level should not keep falling.
When to seek professional help
If overheating persists after a correct bleed, or if you detect leaks, consider a professional inspection. Shops can vacuum-fill, pressure-test, and check for combustion gases in the coolant to rule out head-gasket failure.
You should also get help if the vehicle uses an electric coolant pump, complex hybrid cooling loops, rear heater circuits, or service procedures that require scan-tool activation. Guessing on those systems can leave air trapped and may cause repeat overheating.
- Stop driving immediately if the temperature warning light comes on or the gauge climbs into the danger zone.
- Call for help if steam appears, coolant pours out, or the heater suddenly blows cold during an overheat.
- Ask for testing if the coolant loss continues with no visible leak.
Related Guides
Frequently Asked Questions
What does bleeding a cooling system do?
Bleeding a cooling system removes trapped air so coolant can circulate and transfer heat properly. Air pockets can cause hot spots, unstable temperature readings, overheating, and poor heater performance.
How can I tell there’s air in the coolant?
Look for fluctuating temperature gauges, overheating, gurgling sounds from the dash, or a heater that blows cold at idle. Recheck the coolant level after the engine cools. If it keeps dropping, inspect for leaks.
Can I bleed the system without a bleed screw?
Yes. Warm the engine from cold with the heater on, maintain the reservoir or radiator level, and let bubbles escape through the fill point. A spill-free funnel or vacuum-fill tool can make the job faster and more thorough.
Is it safe to open the radiator cap when hot?
No. Hot cooling systems are pressurized and can spray scalding coolant. Wait until the engine is completely cool before opening any radiator cap, reservoir cap, or bleed screw.
When should I get a mechanic involved?
Get a mechanic involved if the vehicle still overheats, loses coolant, shows white exhaust smoke, or has repeated bubbles in the coolant after proper bleeding. A shop can vacuum-fill, pressure-test, and check for combustion gases.
How long does it take to bleed a cooling system?
Most basic bleeding jobs take about 30 to 90 minutes, including warm-up and cool-down checks. Some vehicles take longer because they have multiple bleed points, complex heater circuits, or special service procedures.
Why does my heater blow cold after adding coolant?
A heater that blows cold after adding coolant often means air is trapped in the heater core or coolant is still low. Bleed the system again from cold, keep the reservoir filled, and check for leaks if the problem returns.
Sources
- CPS Products Airlift-style vacuum-fill instruction sheet — general vacuum-fill tool setup, filling process, and cautions.
- SAE J1436 overview — industry reference for coolant system filling and deaeration practices.
- AAA guidance on overheating vehicles — roadside overheating safety and immediate driver actions.
