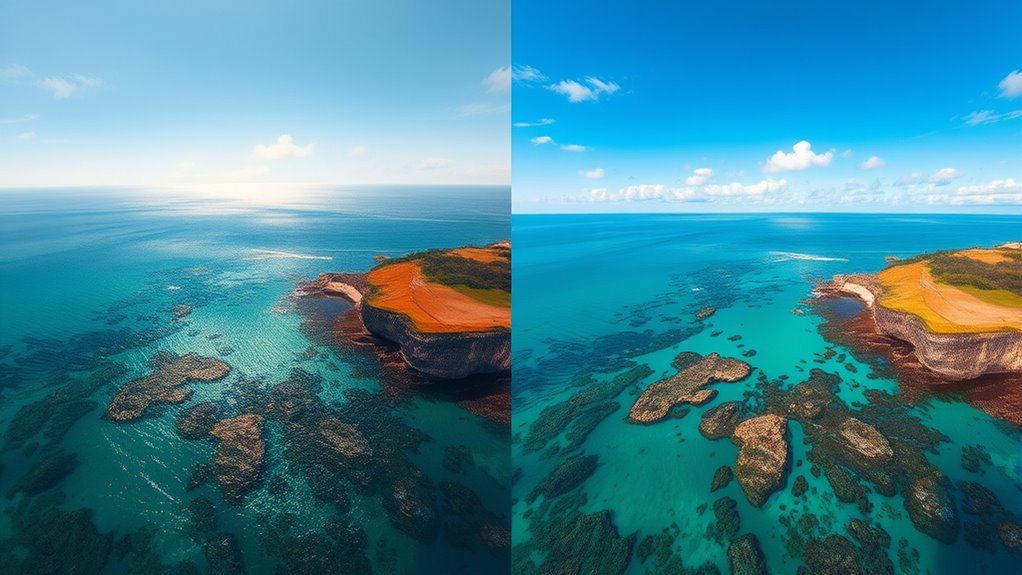
Polarizing ND filters on the Mavic 2 Pro are used when exposure control alone is not enough. They reduce light like normal NDs, but also cut glare and reflections from water, glass, and metal. That improves color saturation, contrast, and tonal separation in bright scenes. Standard ND filters are better for matte terrain or fast-changing light because they are simpler and more predictable. Sun angle and camera orientation strongly affect polarization, and more detail follows.
Key Takeaways
- Polarizing ND filters reduce glare and reflections on water, glass, and shiny surfaces, giving cleaner aerial footage.
- They improve color saturation and tonal separation, especially in bright sunlight, compared with standard ND filters.
- Normal ND filters only reduce light, making them more predictable for general exposure control and fast-changing lighting.
- ND/PL filters work best when the camera angle and sun position favor polarization, especially near a 90-degree sun angle.
- Use ND/PL on reflective scenes; use standard ND on matte terrain or when you want simpler, more consistent exposure control.
ND Vs ND/Pl for Mavic 2 Pro

For the Mavic 2 Pro, the choice between ND and ND/PL filters comes down to whether the priority is simple exposure control or exposure control plus reflection management.
ND filters only cut incoming light, preserving a straightforward setup for general aerial work and rapidly changing illumination.
ND-PL filters add polarization, so they also suppress glare and reflections, especially on water or polished surfaces, while increasing saturation and contrast. That extra optical control can produce cleaner, more liberated-looking footage with richer color fidelity.
ND-PL filters suppress glare and reflections while deepening saturation and contrast for cleaner, richer-looking aerial footage.
However, ND-PL filters demand more discipline: polarization must be set before flight, because gimbal movement can alter alignment and reduce effectiveness mid-air.
For operators seeking freedom from overexposure alone, standard ND remains the simpler tool.
For those pursuing enhanced tonal separation and reduced reflective interference, ND-PL filters offer a more specialized, technically capable option, provided the scene and setup justify the added complexity and planning.
When ND/PL Filters Work Best
ND/PL filters perform most effectively over water, wet pavement, and other shiny surfaces where reflected light can flatten contrast and reduce color depth.
Their polarization component suppresses glare while the ND element preserves exposure control in bright conditions, producing cleaner detail and stronger saturation than a standard ND filter alone.
Performance is maximized when the camera angle is adjusted relative to the reflection source, since specific shooting angles determine how much reflected light is actually canceled.
Water And Shiny Surfaces
Polarized ND filters are especially effective over water and other highly reflective surfaces, where they suppress glare and reveal clearer detail, richer color saturation, and stronger contrast in the recorded image. In aerial work, polarized ND filters outperform normal NDs when filming wet pavement, glass, or rippled channels, because reflections no longer dominate the frame. Their benefit depends on camera angle and sun position, so precise positioning remains essential for consistent results.
| Surface | Result |
|---|---|
| Water | Cleaner texture |
| Glass | Deeper color |
| Wet pavement | Higher contrast |
| Foliage | Hidden detail |
This selective advantage supports freer visual control, but only where reflection exists. Away from shiny surfaces, the effect diminishes, making deliberate use more efficient than constant deployment.
Glare Reduction Benefits
When glare is the limiting factor, ND/PL filters are at their most effective over water, wet pavement, and other reflective surfaces, where they suppress specular highlights and restore clearer detail.
Compared with standard ND filters, these filters add polarization, reducing mirror-like reflections that would otherwise flatten aerial imagery. The result is stronger contrast, richer saturation, and cleaner tonal separation, especially under bright sun.
Their advantage is most pronounced when the aircraft is positioned so reflected light reaches the lens at oblique angles, making careful pre-flight orientation important.
For filmmakers seeking visual freedom, the benefit is practical: fewer blown highlights, less post-production correction, and more natural footage straight from capture.
In technical terms, ND/PL filters convert uncontrolled glare into controlled image depth.
Best Shooting Angles
Ideal results from polarizing ND filters depend less on the filter itself than on the geometry of the shot, because polarization is strongest when the camera is oriented roughly 90 degrees to the sun.
These best shooting angles let ND/PL glass suppress glare while preserving a liberated, high-contrast image.
- Over water: reflections collapse, revealing texture beneath.
- Across shiny surfaces: specular highlights are restrained more effectively than with normal NDs.
- During golden hour: skies deepen, foliage gains saturation, and tonal separation improves.
- In harsh midday sun: exposure is controlled while color remains clean and assertive.
Preflight polarization adjustment matters, since gimbal rotation can shift alignment and weaken the effect during dynamic shooting angles.
Compared with plain NDs, polarizing ND filters offer greater visual control when light, subject, and camera axis are deliberately arranged.
When a Standard ND Filter Is Better
A standard ND filter is often the more practical choice for general videography in changing lighting, because it delivers predictable exposure reduction without introducing polarization variables.
On the Mavic 2 Pro, that consistency helps operators maintain smooth motion and balanced shutter control while moving through mixed conditions. Unlike polarizing alternatives, a non-polarized ND preserves natural reflections, which matters in sunsets, rainbows, wet surfaces, and other reflective scenes where visual energy would otherwise be suppressed.
On the Mavic 2 Pro, consistent ND control preserves smooth motion and natural reflections in mixed lighting.
In low-glare environments such as interiors, tree shade, or overcast spaces, it manages brightness efficiently without requiring extra adjustment. This simplifies flight workflow when rapid exposure changes are needed, since there is no need to reorient the filter or recalibrate mid-flight.
For casual users seeking liberated, low-friction operation across diverse shooting scenarios, the standard ND is often the more versatile and technically straightforward tool, especially when image control must remain stable and immediate.
How Sun Angle Affects Polarization
Polarization effectiveness depends heavily on sun position, with the strongest glare suppression typically occurring when the sun sits near a 90-degree angle to the camera lens.
At this sun angle, a Polarizing ND Mavic 2 Pro can more aggressively tame reflections from water or glass, producing cleaner tonal separation and richer saturation.
- Near 90 degrees: maximum polarization, best glare control.
- Sunrise or sunset: low sun angle weakens the effect, so reflections persist.
- Camera yaw changes: shifting orientation alters the polarization plane and visible result.
- Preflight setup: filter orientation should be chosen before launch, because mid-flight sun angle changes can reduce performance.
Compared with normal NDs, polarizing filters offer selective optical control rather than only exposure reduction.
That distinction matters for creators seeking visual freedom from distracting highlights, yet the benefit remains contingent on geometry.
When the sun angle is favorable, the image gains clarity; when it is not, the same filter behaves more modestly.
Best Mavic 2 Pro ND Filter Strengths
After the geometry of the sun and lens determines how well glare is suppressed, the next variable is filter strength, which for the Mavic 2 Pro is commonly centered on ND4, ND8, and ND16. For liberated aerial imaging, polarized ND filters should be matched to EV readings and scene brightness, not chosen by habit.
| Strength | Use case |
|---|---|
| ND4 | Hazy or lightly bright scenes |
| ND8 | Slightly overcast light |
| ND16 | Bright sun, stronger motion blur |
ND8 usually preserves balance on subdued days, while ND16 better restrains excess light in intense daylight, helping maintain shutter speeds that render smooth motion. ND4 remains useful when only modest attenuation is needed. A practical target is EV -0.3 to +0.3; if exposure trends toward -0.7 EV, a lighter filter may restore detail. Compared with normal NDs, polarized ND filters also improve saturation and tame reflections, especially over water, supporting cleaner, more autonomous visual expression.
How to Set Up ND Filters on the Mavic 2 Pro
Setting up ND filters on the Mavic 2 Pro begins with selecting a strength matched to the ambient light and shutter target, since weaker and stronger filters produce different exposure control and motion-rendering results.
With the drone powered off, the filter should be aligned to the lens and twisted clockwise until it locks, reducing the risk of gimbal stress during mounting.
If the filter is polarized, the outer ring should be rotated before takeoff to tune glare reduction and reflection suppression, then checked against EV changes in flight.
Choosing Filter Strength
Filter strength on the Mavic 2 Pro should be matched to shutter-speed targets dictated by frame rate, with the goal of preserving natural motion blur rather than simply darkening the image.
- At 30fps, an ND setting that supports 1/60s is the practical baseline.
- In manual mode, keep ISO 100 and aperture between f/2.8 and f/4 for cleaner files.
- Watch EV during flight; if readings drift beyond ±1.0, move to a stronger or weaker filter.
- Choose an ND/PL filter when reflective water or wet pavement demands lower glare and richer color.
Compared with ordinary NDs, an ND/PL filter offers greater tonal control and visual freedom, provided polarization is set before takeoff.
Mounting And Polarization
Once the correct ND or ND/PL strength has been selected for the target shutter speed, the next step is physical installation and polarization alignment on the Mavic 2 Pro.
With power off, the operator performs mounting by gently twisting the filter onto the lens until it clicks, never forcing the interface. This secure fit matters because loose hardware compromises freedom of motion and image stability.
For polarized ND filters, rotation is then used to tune glare suppression and reflection control while viewing the live feed. Bright water and glossy surfaces usually benefit most, compared with standard NDs, which only cut light.
Alignment must be checked before takeoff, since attitude changes alter polarization. A test shot confirms exposure, saturation, and any needed ISO or aperture adjustment.
Common ND/PL Filter Mistakes
A frequent set of mistakes occurs when ND/PL filters are treated as a universal solution rather than a situational tool: polarization should be adjusted before each flight, since glare reduction and color saturation depend on the drone’s angle relative to the sun and the reflective surface below.
- Beginners often leave polarizing ND filters unchanged, then blame weak contrast on the lens instead of the setup.
- They ignore reflection changes as the aircraft turns, producing footage that swings from clear to washed out.
- They use ND/PL filters where they add little value, such as over matte terrain, wasting light budget.
- They attempt mid-flight tweaks and fail to monitor EV, inviting overexposure or underexposure.
Compared with normal NDs, ND/PL filters demand more discipline, but they also grant greater visual autonomy when used deliberately.
How to Choose the Right Filter Type
Choosing between ND and NDPL filters depends primarily on the shooting environment and the intended image characteristics.
NDPL suits scenes with water, glass, or metallic surfaces, where reflections and glare suppress detail. By reducing light while polarizing the image, it can strengthen contrast and saturation, giving footage a cleaner, more emancipated visual character.
Standard ND filters, by contrast, deliver predictable exposure reduction without altering color or reflection behavior, making them more versatile for general aerial work.
Selection should consequently follow the scene, not habit. When the camera angle shifts relative to the sun, NDPL effectiveness changes with polarization alignment, so results should be checked in flight.
For broader coverage, a mixed set is practical: ND8PL for reflective environments and ND8 or ND16 for neutral applications. This combination preserves creative freedom while maintaining technical control across varied shooting conditions.
Which Mavic 2 Pro ND Filter Should You Buy?
For the Mavic 2 Pro, the most practical choice depends on the shooting environment, but ND8PL and ND16PL filters are often the strongest starting points for bright outdoor work because they both cut exposure and help suppress glare while increasing color saturation.
- ND8PL suits moderate light, offering flexibility for mixed conditions and preserving motion blur control.
- ND16PL is better under harsh sunlight, especially when the goal is cleaner skies and richer tonal separation.
- Non-polarized ND filters remain useful for general scenes, yet polarized ND filters outperform them near water, glass, or wet roads.
- Brand choice matters: PolarPro and KnF often deliver cleaner color fidelity than Freewell, which may introduce casts.
Because polarized ND filters are angle-sensitive, pre-flight testing is essential. A Mavic pilot seeking visual freedom should match ND strength to light, then verify polarization before takeoff to avoid missed shots.
Frequently Asked Questions
Should I Use an ND Filter or Polarizer?
An ND filter suits general exposure control, while a polarizer benefits Creative Photography by suppressing glare and enriching saturation. For reflective water, glass, or bright skies, the polarizer delivers clearer, more liberated imagery.
When Not to Use a Polarizing Filter?
Glass stillness under gray skies, no sparkle to tame. A polarizing filter is not used without reflections, toward the sun, in low light, or when preserving sunsets; Reflection Control then offers no liberation.
Do ND Filters Reduce Quality?
ND filters do not inherently reduce quality; they preserve Image Clarity when well made and properly maintained. Cheap, dirty, or scratched filters can soften detail, shift color, or add artifacts, while quality units minimize degradation.
Can You Leave a Circular Polarizing Filter on All the Time?
Yes, a circular polarizing filter can remain mounted, though a medieval tinkerer would inspect it often. Filter Maintenance matters: polarization, exposure loss, and color shifts vary by sun angle, so regular adjustment preserves clarity and liberation.
Conclusion
For the Mavic 2 Pro, ND/PL filters can be preferable when surface glare from water, glass, or wet terrain needs to be subdued while preserving motion blur control. Standard ND filters remain the more predictable choice when consistent exposure reduction is the only requirement, especially in changing sun angles where polarization can become uneven. In practice, the better filter is the one whose compromises are least visible, allowing the aircraft to retain a more composed, polished visual character.
