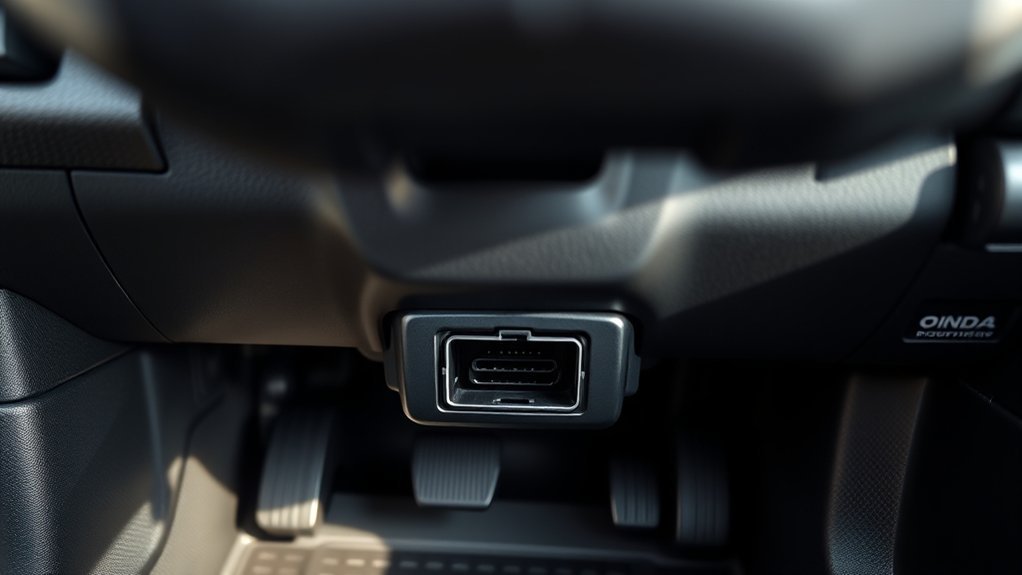
Your Toyota Tundra’s OBD2 port is beneath the lower driver-side dashboard near the steering column and upper brake-pedal area. On many 2007–2021 trucks, it sits slightly left of the steering column; 2022–2026 trucks use the same general under-dash area. Panel removal is normally not required. Look for a fixed, 16-pin, trapezoid-shaped connector that gives a compatible scanner access to diagnostic trouble codes and supported live data.
Last updated: September 19, 2026.
Quick Answer
Look beneath the Toyota Tundra’s driver-side dashboard, usually just left of or below the steering column and around the upper brake-pedal area. Find the fixed, 16-pin, trapezoid-shaped diagnostic connector. You normally do not need to remove a dashboard panel to reach it, but its exact angle can vary by model year and dashboard design.
Key Takeaways
- The Tundra OBD2 port is beneath the lower driver-side dashboard near the steering column and brake-pedal area.
- Panel removal is normally unnecessary because the connector is directly accessible from the driver footwell.
- A trouble code identifies a detected condition or system. It does not automatically prove that a particular part has failed.
- Save stored or confirmed codes, pending codes, permanent codes, and freeze-frame data before clearing anything.
- Use a scanner that specifically supports your Tundra’s model year and the vehicle systems you need to access.
At a Glance
| Access | Normally directly accessible beneath the driver-side dashboard; panel removal is usually not required |
| Difficulty | Easy |
| Tools Needed | Flashlight and a compatible OBD2 scanner |
| Cost | No cost to locate; scanner cost varies by capability |
Finding the OBD2 Port in Your Toyota Tundra

Park your Tundra on a level surface, shift into Park, apply the parking brake, and switch the ignition off. Open the driver’s door and look upward beneath the lower dashboard with a flashlight. The connector is normally exposed beneath the dash, so you should not need to remove a trim panel just to plug in a scanner.
- Start below the steering column. Search the lower knee-panel area on the driver’s side.
- Move slightly to the left. On many Tundras, especially 2007–2021 trucks, the port sits slightly left of the steering column rather than directly beneath its center.
- Check the upper brake-pedal area. Look above and around the main brake pedal where the lower dashboard ends. Do not rely on the parking-brake pedal as the only landmark.
- Identify the connector. The port is a fixed, female, 16-pin connector with a trapezoid or D-shaped opening.
- Do not confuse it with a loose wiring plug. The OBD2 connector should be secured to the dashboard structure and positioned where a scan-tool cable can reach it.
| Model years | Where to look |
|---|---|
| 2000–2006 | Under the driver-side dashboard near the steering column. Scan the exposed lower-dash area because the connector angle and nearby hardware can vary. |
| 2007–2021 | Under the driver-side dashboard, commonly slightly left of the steering column. On 2013–2021 examples, the connector is commonly positioned just above the brake-pedal area. |
| 2022–2026 | Under the driver-side dashboard near the steering column in the same general footwell area. Confirm the connector visually before attaching a tool. |
The most reliable landmark is the lower driver-side dashboard near the steering column and upper brake-pedal area, not the parking-brake pedal alone.
Note: Dashboard layouts can differ by model year and market. Use Toyota’s official manuals and warranties portal for your exact Tundra when you need model-specific operating, warning, or fuse information. Factory service information may be required for detailed DLC3 electrical diagnosis.
Why You Need to Know About Your OBD2 Port
The port connects your truck to a code reader or scan tool. Toyota service information commonly calls this connector the DLC3, or Data Link Connector 3. Its physical design follows the SAE J1962 diagnostic-connector standard, but the information available through it depends on the scanner, the Tundra’s model year, and the control module you need to access.
The Tundra model years covered here, 2000–2026, are all within the OBD-II era. Standard OBD-II access focuses heavily on emissions-related powertrain information, while Toyota-enhanced diagnostic tools may communicate with additional control modules when the vehicle and scanner support them.
| Function | Practical benefit |
|---|---|
| Read diagnostic trouble codes | Provides a starting point for diagnosis |
| View freeze-frame information | Shows available operating conditions recorded when a fault was detected |
| Monitor supported live data | Helps compare sensor readings and operating conditions |
| Check emissions readiness | Shows whether supported self-tests have completed |
| Clear eligible diagnostic information | Used after a repair or as part of a documented diagnostic procedure, not as a repair by itself |
A basic code reader may access only generic emissions-related powertrain codes. A more capable Toyota-compatible scanner may also communicate with systems such as the transmission, ABS, airbag, body, four-wheel-drive, parking-brake, or hybrid controls when supported.
Using an OBD2 Scanner on Your Tundra
Read the scanner manufacturer’s instructions before connecting it. Procedures vary, especially between handheld readers, Bluetooth adapters, professional tools, and hybrid-compatible equipment.
- Park safely. Shift into Park, apply the parking brake, turn off accessories, and switch the ignition off.
- Inspect the plug and port. Do not connect the scanner if you see moisture, corrosion, damaged terminals, or bent pins.
- Insert the scanner straight. Align the trapezoidal plug and press it in gently. Do not force it or rock it from side to side.
- Follow the scanner’s ignition prompt. Many tools ask for the ignition to be switched to ON/RUN without starting the engine. Some tests require the engine to run.
- Enter the vehicle details. Select the correct year, Toyota, Tundra, engine, and powertrain when the tool requests them.
- Run a complete scan when supported. Record stored or confirmed codes, pending codes, permanent codes, any module history codes the tool exposes, and available freeze-frame data.
- Research the code and test the system. Do not replace a component based only on the code description.
- Disconnect correctly. End the scanner session, switch the ignition off, and pull the connector straight out by its housing rather than its cable.
Warning: Do not clear codes before saving the code numbers and freeze-frame data. Erasing diagnostic information does not repair the cause, may switch the warning light off only temporarily, and can reset emissions-readiness monitors. If the Check Engine Light or MIL is flashing, or the truck has severe shaking, overheating, a low oil-pressure warning, major power loss, smoke, or an unusual mechanical noise, stop driving and arrange professional service.
Pro Tip: Photograph or export the full scan report before disconnecting the tool. The code status, mileage, freeze-frame readings, and control module that reported the fault may be more useful than the code number alone.
What an OBD2 Code Can and Cannot Tell You
A diagnostic trouble code records the condition that a control module detected. It does not automatically identify the root cause or confirm which part should be replaced.
For example, a code related to a sensor circuit could result from the sensor, damaged wiring, a loose connector, low voltage, a vacuum or exhaust leak, contamination, or another fault that caused the reading to move outside its expected range.
Generic and Toyota-Specific Codes
- Generic codes follow standardized definitions and are readable by many basic OBD2 tools.
- Manufacturer-specific codes contain Toyota-specific information and may require an enhanced scanner or service information.
- Powertrain codes commonly begin with P.
- Body, chassis, and communication codes commonly begin with B, C, and U, but a basic reader may not access every related module.
Stored, Pending, and Permanent Codes
- Stored or confirmed codes indicate that the system met the conditions required to record the fault.
- Pending codes indicate a fault that has been detected but may not yet have met the conditions needed to illuminate the Check Engine Light.
- Permanent codes are retained on supported vehicles until the onboard system confirms that the fault is no longer present under the required operating conditions. A normal clear-code command does not simply erase a supported permanent DTC; the applicable onboard checks must verify the repair.
- Freeze-frame data captures supported operating information associated with a recorded emissions-related fault.
Common Errors and Alerts From Your OBD2 Scanner

Your scanner may display a trouble code, a warning-light status, an incomplete readiness monitor, or a communication error. Read the complete description and status instead of focusing only on the code number.
Check Engine Light Is On
A steady Check Engine Light means the engine or emissions control system has detected a fault that requires diagnosis. The cause may be minor or serious, so scan the truck promptly and consider how it is running before continuing to drive.
The Light Returns After Clearing
The fault condition is still present, has returned, or the repair has not been verified. Repeatedly erasing the code can remove useful evidence without correcting the problem.
A Readiness Monitor Shows “Not Ready”
The relevant self-test has not completed since codes were cleared, battery power was interrupted, or the required operating conditions were not met. Avoid repeatedly clearing codes before an emissions inspection. The EPA’s inspection and maintenance guidance explains how OBD information is used to identify vehicles that may need emissions-related repairs.
Why Your OBD2 Scanner Will Not Connect
If the scanner displays “No Communication,” “Link Error,” or does not power on, work through these checks in order.
- Confirm the ignition state. Follow the scanner prompt and place the ignition in ON/RUN when required.
- Reseat the plug. Switch the ignition off, remove the scanner, inspect the connector, and reconnect it firmly.
- Check scanner compatibility. Confirm that the tool supports the Tundra’s model year, engine, powertrain, and requested control module.
- Inspect the connector. Look for bent, pushed-back, dirty, corroded, or damaged terminals. Do not probe the pins with random metal objects.
- Check 12-volt system condition. A weak battery or abnormal system voltage can interfere with diagnosis. Verify the battery and electrical system if the truck shows low-voltage symptoms.
- Check the appropriate fuse information. If the scanner does not receive power, consult the exact owner’s manual or wiring information before inspecting or replacing a fuse. Never install a fuse with a higher amperage rating.
- Try another known-compatible scanner. This helps separate a vehicle-side problem from a failed adapter, cable, app, or scan tool.
- Seek professional diagnosis. A damaged connector, network fault, wiring problem, or control-module communication issue may require electrical testing.
Note: A scanner that reads engine codes successfully may still be unable to access ABS, airbag, body, hybrid, or four-wheel-drive modules. That usually reflects the tool’s coverage rather than a damaged OBD2 port.
Tips for Maintaining Your Toyota Tundra’s Diagnostic System
The OBD2 connector normally needs inspection rather than scheduled cleaning. Keep the area dry, avoid striking the port with your feet or stored objects, and do not leave the cable under tension.
- Inspect the port before connecting a tool, especially after water intrusion, dashboard work, or electrical repairs.
- Remove loose dust with clean, dry air or a soft nonmetallic brush when necessary.
- Do not spray cleaner directly into the connector.
- Never force a damaged or incorrectly shaped plug into the port.
- Keep scanner apps and scan-tool software current through the tool manufacturer.
- Use Toyota service information or a qualified technician for vehicle control-module programming and calibration updates.
- Remove an unneeded Bluetooth, insurance, tracking, or telematics dongle instead of leaving an unknown device connected indefinitely.
Research into connected OBD devices has identified potential privacy and security concerns because third-party dongles can access vehicle data and, depending on the system, may interact with vehicle networks. Use reputable hardware and software, protect the associated phone or account, and avoid untrusted adapters. A physical OBD lock can add a deterrent, but it should be combined with ordinary vehicle security rather than treated as guaranteed theft prevention.
When to Get Professional Diagnostic Help
Arrange professional service when the scan results involve a safety system, the truck runs poorly, the warning returns after repair, or the scanner cannot communicate after basic checks.
Professional diagnosis is also appropriate when you find damaged wiring, melted terminals, water in the connector, multiple communication codes, low-voltage symptoms, or faults involving the airbag, braking, steering, hybrid, fuel, or high-voltage systems.
Toyota recommends consulting the exact owner’s manual for model-specific warning-light information. Its warning-light resource also directs owners to select their vehicle and obtain the applicable instructions.
Related Guides
Frequently Asked Questions
Do all Toyota Tundras have OBD2?
U.S.-market Toyota Tundras from the 2000–2026 model years covered here are within the OBD-II era. Standard OBD-II access covers emissions-related diagnostic information, while access to Toyota-specific modules and functions depends on the scanner and exact model year.
Where is the OBD-II port in a Toyota Tundra?
Look under the lower driver-side dashboard near the steering column and upper brake-pedal area. On many 2007–2021 trucks, the connector sits slightly left of the steering column. Look for a fixed, 16-pin, trapezoid-shaped socket.
Do I need to remove a panel to reach the Tundra OBD2 port?
Normally, no. The Tundra’s diagnostic connector is directly accessible beneath the lower driver-side dashboard. Use a flashlight and look upward near the steering column and brake-pedal area before removing any trim.
Can I leave an OBD2 scanner plugged into my Tundra?
Some compact adapters and telematics devices are designed for longer-term connection, but do not assume every scanner should remain plugged in. Remove a device if it can interfere with your legs or pedals, if the manufacturer does not support continuous use, or if you do not trust or need the connected hardware or app.
Can I clear the Check Engine Light with an OBD2 scanner?
Many scanners can clear eligible emissions-related diagnostic information, but erasing the code does not fix the underlying fault. Save the complete scan report first, diagnose and repair the cause, and understand that clearing codes may reset emissions-readiness monitors. Supported permanent DTCs are not simply erased by a normal clear-code command.
Why does my scanner say “No Communication”?
Common causes include the wrong ignition position, a loose plug, an incompatible scanner, a failed adapter, low system voltage, loss of connector power, a fuse or wiring problem, damaged terminals, or a vehicle-network fault. Follow the tool instructions, verify the 12-volt electrical system when needed, and consult model-specific fuse information before replacing anything.
Sources
- Toyota Manuals and Warranties — model-year-specific owner information and manuals.
- Toyota Warning Lights — official guidance for checking warning information against the selected vehicle and owner’s manual.
- SAE J1962 Diagnostic Connector Standard — standardized diagnostic-connector design, access, terminal allocation, and electrical-interface requirements.
- U.S. EPA Vehicle Emissions Inspection and Maintenance Information — how OBD information and readiness status support emissions inspection and repair decisions.
- OBD Advisor Toyota Tundra Port Locator — cross-check of the under-dash location and model-year ranges.
- OBDeleven Toyota Diagnostic Port Locator — cross-check of the Tundra connector position for 2013–2021 models.
- Man-in-the-OBD: Security Research on Automotive Dongles — research into security and privacy considerations for third-party devices connected through the OBD interface.
Conclusion
Your Toyota Tundra’s OBD2 port is normally beneath the lower driver-side dashboard near the steering column and upper brake-pedal area. On many 2007–2021 trucks it is slightly left of the steering column, while 2022–2026 trucks use the same general under-dash location. You normally do not need to remove a trim panel to reach it.
Connect a compatible scanner carefully, save the complete diagnostic report, and treat every code as a starting point rather than a confirmed parts diagnosis. Do not erase codes simply to switch off a warning light. When the truck has severe symptoms, safety-system faults, damaged wiring, low-voltage problems, or repeated communication errors, arrange qualified professional diagnosis.
